Baron Wittard: Nemesis of Ragnarök
by
Wax Lyrical Games
Walkthrough by
MaGtRo February 2011
Gameplay:
This is a first person point and click game.
The main menu has new
game, load game, save game, options, credits, exit and cancel.
In Options, the mouse
and keyboard speed adjustments and subtitles selection are seen.
The ESC key accesses the main menu.
During gameplay, right
click to hold the screen from panning and then move cursor to top of the
screen. The menu icon and inventory is seen. Right click also skips the
cutscenes.
This is a non linear game. The walkthrough is
arranged in just one way of gameplay.
Listen to the new
message from Kate, your editor. You are a magazine photographer driving towards
Wittard Utopia, created by architect Baron Wittard.
After leaving the car
and a walk in the woods, be inside the perimeter fence. Kate calls again.
In inventory is a
piece of paper and the video camera.
Look for entrance to
Wittard Utopia.
Look at the Wittard
Utopia sign. Check the condemned notice on the window of the trailer above the
sign.
Stone stand IV: Pan right
and see a stone stand with IV and a red button.
Turn right to the gate
and look close. It is tied by a warning ribbon. How you got in is a mystery.
Turn around. Go forward towards the
big orange ground excavator. Ahead see the courtyard in front of Wittard
Utopia and a dry fountain with a rearing horse statue.
Unnumbered stone
stand: In front of the excavator, turn right and see
another stone stand by the red gantry. See that it doesn't have a Roman numeral;
just a red button.
Turn right and forward
to a hole blocked by bars in the ground.
Stone stand VII:
Go back to the front of the dry fountain and see a cement mixer at far end of
the ground.
Go behind the cement
mixer and see another stone stand. It is numbered VII.
Turn around and look
up at the building. There are lights on some of the windows.
Go forward close to the front of the building. Check the red large
metal container on the left. In front of it is a large hole. See cable on the
ground that brings power to the building.
Stone stand VI:
Go to front of the building and turn left to see behind the red metal
container. See stone stand VI.
Wittard Utopia
leaflet: Go to the barred main door of the building.
Turn left and see a
trash bin. Check the trash bin.
Read the Wittard
Utopia leaflet. Take note that the number of the address at bottom of leaflet
is circled: 5735.
There is a magazine behind the leaflet.
Stone Stand III:
Turn around from trash bin and go forward to end of platform. See stone stand
marked III.
Stone Stand V:
Turn right, forward and see a stone stand ahead by the fence. Go to stone stand and see
that it is marked V.
Open entrance to Wittard Utopia.
Stone stands:
Using the clue from the leaflet press the red button on stone stands V and
then VII, then III and V again.
After pressing the
last number V, hear a sound like something raised.
Get a call from Kate
again. She mentions the disappearance of townspeople last seen close to here
at Utopia. Interference noise is heard and the call is cut off.
Metal bars panel:
Go to the unnumbered stone stand in front of the large orange excavator.
Press the red button.
See a panel.
The aim of the puzzle
is to place all the metal bars at the center red line.
There are 5 buttons at
left that moves the bars to different positions.
The switch at the
bottom is on zero and can be used to reset the puzzle. After 5 incorrect
entries the puzzle resets.
Labeling the 5 buttons
from top to bottom as 1 to 5: slide or click on 2 4 2 1 4.
Hear a sound.

Go right and forward
to the hole in the ground. See that the bars are gone.
Click to climb down
the metal rungs.
Underground of Utopia.
Tunnel:
Go forward and hear a man talking on a cell phone to Alex. Learn that he has
the amulet and sees you trying to enter.
Go forward when he
checks his bag. He hears you. Learn about the ventilation shaft, alternative
exit, chained door and bright light.
Amulet:
Go forward to end of hallway and look at the floor. See that what is left of the voice is
a flashlight, shoes and briefcase.
There's a chained door on the right.
Check the briefcase
and read the ID card: Aaron Ross, janitor of Wittard Utopia. Read the
newspaper article about Baron Wittard's Norse collection. Read Aaron's Notes and
Reminders and learn how he got the amulet.
Take the amulet from
the bag. Pull back. The amulet talks!! You must be the Chosen one and the
amulet is now bounded to you. The amulet warns about the chained door; learn
that "he" escaped and
gives instructions on how to get out of here.
Ventilation Shaft:
Go forward once and turn left. Enter the ventilation shaft until the end.
Conduit 53A:
The amulet tells you to go right. Go right to the door.
Click on door. The white door is blocked.
Turn around and go
forward to the other door. Enter through blue
door.
The amulet reveals
itself as Baron Wittard talking from the spirit plane. He instructs on what to
do next.
Baron says to seek out
10 ancient runes stones.
Red eye symbol:
Go forward 3 times and look on the right wall. See
red symbol 1 that looks like an eye. Keep a
look out for colored symbols during the game. The number of
colored symbols seen will be needed later.

Go to end and then
click to climb up the metal ladder.
Maintenance and
basement of Utopia.
Boiler room:
You exited through the manhole on the floor of the boiler room of
Utopia.
Check the right boiler
and take the cover off. See that something can be done here later.
Desk:
Check the desk right of the stairs. Read the Taste of Spice takeout paper from
the tack board.
Read also the duty
roster and note that Damien hears noises in the sewer. There's taxi calling
card also.
Read the letter on the desk from
Tony the regional manager about Wittard's complaints.
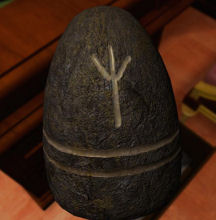
Take F shaped rune 1
from the box. The runes and the amulet can be seen at bottom left of the game
screen.

Emergency power
supply: Check the panel left of the stairs. Baron Wittard explains about the panel and the puzzle.
It is the Emergency
power supply. Connection points will be found at the ground floor.
Open the panel and see
a 4x4 numbered square. Squares in a row and in a column add up to the number
outside the grid. We do not have enough info here yet.
Turn to the boiler and
see 3 wheels-valves that can be turned. Climb the stairs.

Shops hallway:
Be in a hallway with
shops on either side.
Medical Bay:
Turn right and see a door with a red cross above it.
The door is locked.
Click on the vent
above the door to peek inside. See a table with a bloody pillow.
Click on the base of the door to remove the cover
and see rings that can be moved. Pull back.
Connection point 1:
Go forward once and turn left. See a connection point-pipe at
bottom of wall. Flip the switch to the
right.

Kids Kingdom:
Check the colorful Kids Kingdom.
See yellow square 1 with a circle
inside right of the door.

Look at the alphabet
chart on the floor left of the door.
Continue forward and the lights go out for a moment.
ATM machine:
Turn right and see an ATM machine.
Red eye symbol:
Go forward and see a sofa across the cafe. See red eye symbol 2.
Cafe:
Turn around from sofa and check the menu of the
cafe. Check the Brickyard poster on the door.
Enter the cafe by
clicking on the door handles.
Door at left:
Enter the door at left. Be at the coffee shop. Look around.
Check the last booth
and see yellow square 2 and
green cross 1.
Exit the Cafe.

Door at right -
Bar/Game room: Enter the door ahead. Look around the game
room-bar.
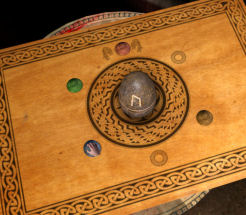
Check the wood table at right and see an
intricate circular symbol with 4 colored upside down bowls.
Exit the room
through the double doors left of the bar (the one you entered on). Turn left and exit through the main Cafe
door to the hallway.
Connection point 2:
Continue forward. Look close at the second connection point-pipe at base
of wall past the cafe. Flip the switch to the
right.
The Blue Dolphin Swimming pool:
Continue forward and try to enter The Blue Dolphin Swimming Pool
at right. The door
is locked.
Look close at blue box
left of the double doors.
Blue box:
Open the box.
The aim of the
puzzle is to place all the pieces seen on the cover at left inside the wire panel at right.
There are several
solutions to this puzzle - this is but one.
Hear electrical connection sound.

Click on door handles to enter. Look around.
Red eye symbol: Look close at middle
sink. Pick up the hairspray and see
green cross 2 on the counter.
Shower room:
Continue forward and left after the lockers to be in the shower room.
Go left and forward
to shower area. Look inside the bucket on the floor to see a
blue diamond 1.

Swimming pool:
Exit the room through door ahead. Look around the swimming pools and chairs.
Pump:
Check inside the round tower like water reservoir at the second swimming
pool and see a rune. The water needs to be drained from this reservoir.
Look close at the
red pump machine in front of the reservoir. See fans, gauges and
buttons.
Press start button
to turn on the diesel fuel.
The object is the
get the pressure gauge to the end of the green area by selecting the correct
fans to increase the pressure.
Each fan when turned
on spins at different speeds and raises the pressure gauge to a certain
distance. If too much pressure, the system turns off and you have to start
again.
Press start.
Select the correct
fans and turn them on. Get the pressure gauge to end of green area.
Press pump button to drain
the reservoir. Hear the water drain.
There are several
solutions to this puzzle - this is but one.

Take the diamond with tails shaped rune 2
from the reservoir.

Lounge area:
Go forward to the lounge area. Go up to the platform and check the table with
a pad of yellow paper.
Check the yellow pad
and see the note about the steam box needs to be reconfigured. 2 colours:
top = neighbouring colour. Bottom is another colour 2 slots away.
See green cross 3.
Lifeguard perch:
Turn around from the lounge and see stairs left of the swimming pool.
Go there and climb to
the top of the lifeguard perch. Look at the view of the room.
On the way down, look
down on the floor and see yellow square 3.
Tiles:
Go down and go to the front of the first swimming pool and by the bar.
Exit right of the bar
and see tiles on the wall. See yellow
square 4.
Balcony:
Climb the stairs across the tile wall. Look around.
Check the table at
end. Look right and check the paper under the chair.
It is a maintenance
sheet. The office door keycode is 7536. Take note of the map that shows the
power supply and the location of the 4 connection points. You already saw #1
and #2.
Go down and exit to
the left and out of the swimming pool area.
Exit to main lobby:
Go through the double doors left of the swimming pool door.
Main lobby:
Elevator:
Check the elevator at left. The elevator is non
functional right now having no power. See a coffee machine at right across the
elevator.
Connection point 3:
Go forward, turn left, forward and left to the wall
behind the elevator.
See connection point 3 at bottom of wall as shown by
the map. The switch is already flipped to the right.
Mezzanine:
Go forward. Climb the spiral staircase on the left of the double doors to inner courtyard.
Connection point 4:
Look close behind the chair ahead. See connection point 4. The switch is
already flipped to the right.
Yellow square
symbol: Turn left to the bathroom doors. Check the boxes in
front of the Ladies room. See yellow
square 5.
Locked door:
Check the locked double doors at middle of mezzanine. Look close at the panel with button left of
the doors. It is not powered yet.
Travels of Odin
Museum: Go to the right and look close at the leaflet
stand at right. Read the top The Travels of Odin museum brochure.
Try to open the museum
door and Baron Wittard warns about powerful energy sealing this door.
Go back down.
Inner Courtyard: Enter
through the double doors beside the spiral staircase.
Music magazine:
Go right and look close at last table. Read the Music Magazine.
Take note of the Prize
puzzle. It looks familiar - similar to the power supply puzzle.
It has 34 on the sides
and 15 is already entered on one of the squares.

Red eye symbol:
Go right and around to the opposite side of the courtyard.
Check the middle post
and see red eye symbol 3 at the base of
the post.
Rune:
Go to the left side of the courtyard and check the boxes in front of the door
to the bar-cafe.
Take n shaped rune 3.
Exit the inner courtyard through the double doors to go back to the main
lobby.

Blocked main door:
Go forward to the other side of the room. See the blocked door.
Front desk:
Go forward to the front desk that is left of the
blocked main doors.
Check the postcards on
the left and the London map on the right on counter of the desk.
Yellow square
symbol: Check the middle postcard on the rack. See
yellow square 6.
Go left and turn
around to enter behind the front desk.
Maps:
Look close at the maps on the desk. There are maps of the ground floor,
first and second floor and roof.
Rune list:
Look at the yellow pad paper. It has the symbol meaning of the runes and the
location of the machines used to extract energies from them.
Safe:
Look at right and see a safe on the base of the wall.
Look close at dial and
see that it has the colored symbols we have been seeing here and there during
our search. We need to find and count those symbols.

Door:
Go to the door right of the "out of order" elevator.
Look down and see
broken tiles. Look close and take E shaped rune 4 under one of the broken
tiles.

Emergency power supply.
Now that we know the clue to the power supply, it is
time to turn it on.
Maintenance room:
Go back to the maintenance room at the
basement-boiler room.
Go forward to the
right end of the room pass the elevator. Go through double doors and forward
until end of the shop hallway.
Go down to the
basement and look close at the power box left of the stairs.
Power supply box:
Open the box and see the 4x4 grid similar to the Prize puzzle
seen in the Music magazine.
The object of the
puzzle is to place numbers on rows and columns that would total to 34.
Click on one number
and then click on the number you want to replace it with.
See the total of that
column and row change.
Once the rows and
columns total to 34, hear a sound. The emergency power is now on.
This is just one
solution to the puzzle.

Turn on the line: If you
haven't yet, go to the 4 connection points shown in the map of the maintenance
list and flip the switches to the right if they need to be so.
There are 2 on the left wall of the Shop hallway,
one behind the elevator and one at the mezzanine.

Balcony garden:
Now that the power is on. Go to the locked door in
the mezzanine.
Look close at panel left of door and press the
button. The power will be on in this button if the switch behind the elevator
and the one behind the chair are pointing to the right.
Enter the balcony that overlooks the inner
courtyard.
Yellow square symbol: Look
left and close to the table on the left.
Lift the cup from saucer. See the
yellow square symbol 7 on the saucer.
Dome lights: Look up at the
dome and see a view of the building windows. Note that some windows are
colored. Remember the color and location of the windows.
Slider tiles: Turn right and
forward to a square block made up of tiles on the floor. Click on it to see that it is a
slider puzzle. We do not have enough info here yet.
First and
Second floor:

Time to check the top floors.
Elevator:
Now that the power is on, go to the elevator in
front of the coffee machine.
If the power is not on, check the connection point
behind the elevator. Flip the switch to the left. The switch should be at
right for the balcony upstairs to have power and left for the elevator.
Press the button at right to call the elevator.
Enter and press 1 on the panel at right of door. See
that the way is blocked.
Press 2 on the panel and exit through the door of
the second floor.
Storage:
Look around the storage room.
Bulletin board: Turn left
and look at the tack board on the left wall.
Check the pictures of Odin and the memo about the
theft (done by Aaron).
Chest: Look at the ornate chest at
the middle shelf. Click on it 3 times to view the side panel of the chest.
Look close at the open side panel.
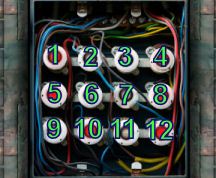
Lights out puzzle: See a
3x4 set of bulbs. Some are lit and some are not.
The aim of the puzzle is to turn off all the lights.
Note that when a bulb is clicked on; it affects the
ones on top, bottom and sides.
One solution is: Click on 1, 4, 9, 12, 6, 1, 5, 3,
11 and 8.
Take M shaped rune 5.


Hallway: Go through the
doors at right of the shelving.
The amulet-Wittard senses something
disrupting the energies. Get a call from Kate, the editor. She wants you to
meet her at the Vikings Museum.
Travels of Odin
Museum:
Go back to the storage and left to elevator door. Go
down to the main lobby - 0.
The amulet senses danger. Get another call from
Kate.
Go up the spiral staircase and enter the museum at
far right.
Get another call from Kate.
Enter the museum and the lights go out
momentarily. See energies sparking in the other room. Hear eerie sounds.
Yellow square symbol: Look
down on the tiles of the floor. See a
yellow square symbol 8 tile.
Book: Go forward. Check the
Viking Mythologie book on the floor. See a piece of paper with lines and dots.
Read the book and learn what each rune stone stands
for. This will help decode the note seen on the yellow pad at the front desk.
This will then correlate which runes to use for each dissolution machine.


| Rune shape |
|
Name |
|
Meaning |
|
Dissolution machine |
|
|
|
|
|
|
|
| M
shaped |
|
Mannaz |
|
The
self |
|
Viking Museum |
| X
shaped |
|
Gebo |
|
Partnership |
|
Maintenance |
| F
shaped |
|
Ansuz |
|
Signals |
|
Inner Garden |
|
diamond with tails |
|
Othila |
|
Separation |
|
Grand Hall |
| n
shaped |
|
Uruz |
|
Strength |
|
Cafe |
| E
shaped |
|
Perth |
|
Initiation |
|
Security Office |
| T
shaped |
|
Naudiz |
|
Constraints |
|
Observatory |
|
Double X |
|
Inguz |
|
Fertility |
|
Medical Bay |
|
Reversed Z |
|
Eihwaz |
|
Defense |
|
Wittard Study |
|
Trident shaped |
|
Algiz |
|
Protection |
|
Wittard Apartment |
Displays: Check the
displays and read the displays. They are interesting.
Rune stones: Turn the
corner to the hallway.
Lights go off. Get a call from Kate. The shade
attacks.
The amulet-Wittard explains about Fenrir and
ragnarok.
Green
cross symbol: Go forward and turn right to look at the
display of a Viking house.
Look down on the firewood under the hanging pot. See
green cross symbol 4.
Amulet: Go forward. The
amulet-Wittard explains further about the museum, ragnarok and rune stones.
You need to find all 10 rune stones and extract
their energies. He left devices that extract the energies. Each device is
specific to one rune stone only.
Yellow square symbol: Go
around the corner and check the displays. See a
yellow square symbol 9 on the Image Stone
display at
right.
Red eye symbol: Go forward
and check the Well of Hvergelmir. Go left to the next room and the display of the replica of a Viking boat.
See red eye symbol 4
on the Lotevag ship display plaque at left.
Rune dissolution machine: Open the chest at
back end of the room. This must be one of the devices that extract energies
from the runes.
Now that we know which rune goes with which
dissolution machine, place the M shaped rune taken from the storage room in
the box. In so doing a puzzle is opened.
Tower of Hanoi puzzle: Look
close at the lid and play the puzzle.
The object of the puzzle is to place all the rings
on the left to the stand on the right.
A large ring cannot go on top of a smaller ring.
The solution shown here is by R. Ellison. Thanks
Bob!

A flash of light is seen and the rune stone is
dissolved.
Amulet-Wittard congratulates you and talks about the
portal - Well of Hvergelmir.

Second
floor Again:
Go back to the second floor. Exit the museum. Go
down and enter the elevator. Go to second floor.
Go through the door at right and be at the hallway.
Right hallway: At the end of the hallway turn right. At the end
of this hallway, see
a baby pram with a white wall ahead and a locked light blue door at left.
Go back to the other end of hallway and see the door to
security.
Security:
Door lock: Look close at
the number lock panel. Remember the security code seen at the Maintenance Task
Sheet.
Enter 7536. Hear a sound. Enter and look around in the security room.
Desk:
Monitors: Look close at
each monitor.
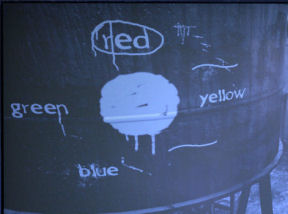
Roof: See that the water
tank on the roof has color words on it. Take note of this clue.
Book: Check the Runaway
Train book on the
table. See the Mattew and Jeff's genealogical chart on the paper. Note their
position on the chart.
Rune: Pull back, go to
right side of room and look at
the active spot at right end of the desk.
Take t shaped rune 6.


Green
cross symbol: Go towards the lockers twice and look up at the light fixture on the
ceiling. See green cross symbol 5 on the
fixture's side panel.
Rune dissolution machine:
Go to the locker with partially opened door. See a round object with runes.
This must be one of the devices that extract energies from the runes.
Coin puzzle: Based on the
list place the E shaped rune taken from under the broken tiles in the lobby
in the round object. A puzzle is seen.
The object of the puzzle is to move all the gold
coins to the left and the silver coins to the right.

You can move the coin to the
next available space.
Move silver coin 1 to space at
right.
Move gold coins 1 and 2 to the
left.
Move silver coins 1, 2 and 3 to
the right.
Move gold coins 1, 2, 3 and 4 to
the left.
Move silver coins 1, 2, 3 and 4
to the right.
Move gold coins 1, 2, 3 and 4 to
the left.
Move silver coins 2, 3 and 4 to
the right.
Move gold coins 3 and 4 to the
left.
Move silver coin 4 to the right.
The rune stone is dissolved.
Amulet-Wittard speaks again. After all the runes are dissolved, return the
amulet to portal and portal will be closed. Then Fenrir will be trapped.
Switch:
Go to the left of the door and look down.
See a white metal cabinet at the base of the
wall. Open the cabinet and see a switch. Flip the switch and hear a sound.
Exit the room.
Unfinished Apartment:
Go forward to the other end of the hallway with
the baby pram.
See that the white wall blocking the entryway
ahead is now gone.
Go to that small room and see another light blue door at left. Go
through this blue door.
Be at an unfinished apartment. Look around.
Green
cross symbol: Look close at the paint can on top of the
crate. See
green cross symbol 6 on the label.
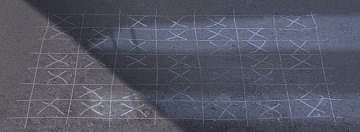
X marks: Go forward and
turn right to an unfinished room.
Look down on the floor and see Xs in a chart drawn
on the floor. Note it down; it is a clue.
Newspaper: Go towards the
room by the boarded up window.
Look down on the floor and read the National News newspaper. Learn
about the missing children last seen playing by the gate of Utopia.
Hole on the wall: Go to the wall
left of the boarded up window and see a hole-grate on the wall.
Go through and be in a finished apartment.
Finished Apartment:
See that you exited out through a closet to be in a
finished apartment. Turn around to remember the door you came out of. Turn
around again and see a bathroom at right.
Kitchen: Continue forward and be
in the kitchen.
See a plate of chocolate on the room divider.
Line puzzle: Look close at
plate and see circles-chocolates and lines.
The object of the puzzle is to remove all the lines.
Click on 2 circles connected by a line and the line
that connects the 2 circles is removed. You can only go to the next adjoining
circle afterwards.
Click on a circle and then an adjoining circle to
remove the line. Continue clicking adjoining circles until all the lines are
removed.
When correctly done, take double X shaped rune 7 from
the secret compartment.


Living room: Go to the
coffee table and see the Building a Utopia - The Baron Wittard Story
brochure.
Symbol paper: Open the paper under
the brochure. It shows the colored symbols seen all throughout the building.
The symbols are added. This is a clue for the safe at the front desk at the
foyer.

Green cross symbol: Turn
around and go to the foyer that has damaged floor. Look down on the part with
tiles removed and see
green cross symbol 7.
Elevator: Exit through the
front door by looking close and clicking on the lock of the door.
Automatically pull back. Click on door handle.
Second floor hallway:
Automatically exit out through the outer light blue door
that was locked before at the second floor hallway with the pram. Now you can enter and exit from this door.
Turn right; go forward in the hallway and left at
other hallway to storage room.
Exit storage room and be at elevator. Press 14 on the panel.
Roof:

Power supply cabinet 1:
Look around at this side area. There is a dome with a walkway on the left.
To the right of dome and over the balcony view, see another side area with a
power supply cabinet.
Ahead on this side area is another power supply
cabinet.
Green cross symbol: Look
close on top of the power cabinet here. See
green cross symbol 8.
Open the power supply cabinet and see 3 switches.
The left has 4 lines, the middle 5 lines and the right one has 4 lines. There
is a black button and a white button below the switches. Flip switches and
press buttons on all lines. We do
not have enough info for these switches.
Pan left and see the water tower seen in the
security room monitor.
Power supply cabinet 2:
Enter the dome and the walkway.
Red eye symbol: Before
entering the dome look down at the walkway and see
red eye symbol 5 on the ramp.
Continue forward and turn right to go to the other
side area.
See the water tower seen on the security room
monitor and the other power supply cabinet. Look to the left over the balcony
and see the observatory in another side area.
Yellow square symbol: Go
right of the power supply cabinet and see a big power bin. See a
yellow square symbol 10 on a right front side
of the bin.
Colored lights puzzle: Open the
power supply cabinet 2 and see 4 colored lights (if you flipped switches and
pressed buttons on the other cabinet) on a 4x5 panel and a valve-wheel below.
The lights look familiar. They are the colors seen
on the windows viewed from the dome of the balcony at the mezzanine.
The object of the puzzle is to move the lights at
the correct position similar to where the windows are located.
The power supply cabinet 1 controls where these
lights can be moved and this power supply cabinet 2 shows the result of the
manipulations done on power supply cabinet 1.
By going back and forth from the 2 power supply
cabinets, learn what adjustments can be made. Move a switch and find out what
changes happened on cabinet 2.
Power supply cabinet 1: Go
back to the other cabinet with the switches. Through manipulation of the
switches and checking cabinet 2; learn that:
Left switch with 4 lines adjusts the placement of
the colors on a column on cabinet 2.The lights on cabinet 2 move top to bottom
when the switches are moved bottom to top. Note that there are 4 floors to the
mezzanine dome view.
Middle switch with 5 lines adjusts the position of
the colors in a row. The lights on cabinet 2 move left to right when the
switches are moved bottom to top. Note that there are 5 windows on a floor of
the mezzanine dome view.
The right switch with 4 lines adjusts a color. Note
that cabinet 2 and mezzanine dome view has the same 4 colors.
Bottom switch or #1 adjusts green.
#2 adjusts orange.
#3 adjust violet.
#4 or top line adjusts yellow.
The black button resets the entry of the switches
and the white button enters the adjustments done on the switches.
Adjust the colors to the correct positions:
By manipulations as mentioned above, know the
position of the windows and the color adjustments.
Press the black button to clear any entries done
before.
Turn the 3 switches for a color adjustment and then
press the white button.
Do the next color until all 4 colors are done.
Power supply 1:
1. Press the black button to clear any previous entry. Do not touch this button again.
2. Arrange the green light by turning:
Left switch to point to second from the bottom line.
Middle switch to point to second from the bottom line.
Right switch to point to bottom line.
Press white button to enter the adjustment.
3. Arrange the yellow light by turning:
Left switch to point to third from bottom line.
Middle switch to point to second from bottom line.
Right switch to point to fourth from bottom line.
Press white button to enter the adjustment.
4. Arrange the violet light by turning:
Left switch to point to second from bottom line.
Middle switch to point to fifth (top) from bottom line.
Right switch to point to third from bottom line.
Press white button to enter the adjustment.
5. Arrange the orange light by turning:
Left switch to point to fourth (top) from bottom line.
Middle switch to point to fourth from bottom line.
Right switch to point to second from bottom line.
Press white button to enter the adjustment.
| Turn |
left switch |
|
middle switch |
|
right switch |
|
|
| |
bottom to top |
|
bottom to top |
|
bottom to top |
|
|
| |
|
|
|
|
|
|
|
| Green |
2 |
|
2 |
|
1 |
|
press white button |
| Yellow |
3 |
|
2 |
|
4 |
|
press white button |
| Violet |
2 |
|
5 |
|
3 |
|
press white button |
| Orange |
4 |
|
4 |
|
2 |
|
press white button |


Power supply cabinet 2: Go
back to the other power supply. See that the colored lights are now in the
correct positions. If not - start over on cabinet 1 by pressing the black
button to clear-reset it.
Valve-Wheel: Turn the valve and
hear a sound of gears turning. Turn around and enter the dome. The dome turned
and now you will go right instead of left. Exit to the observatory.
Novagate Observatory:
Look around.
Green cross symbol: Go to
the door of the observatory and then turn left at top step. See
green cross symbol 9.
Yellow square symbol: Enter
through door and look at the fallen urn at left. See a
yellow square symbol 11.
Dome: Climb upstairs and
look around. The Amulet-Wittard explains about the observatory.
Desk: Go around to the
desk at other side of the room. Look close.
Green cross symbol: See
green cross symbol 10 on the book cover at left.
Note: Read the note
made by Aaron. Learn that the boiler setting is 112321 and note the
names of Wittard's relations: Sophie,
William, Emma and Sarah.
Rune: Open the left
side middle drawer of the desk to get X shaped rune 8.

Rune dissolution machine:
Turn right and look close at the machine on the railing around the telescope.
Click on the screen. Press start.
Place the T shaped security rune at bottom of the machine. The
puzzle opens. Click Play.
Memory puzzle: See
dots on the screen. One of the dots will light up and you have to click
on that dot.
Then the first light will flash and a new one.
Click on those 2 in sequence. The cycle will repeat with a new light
each time you correctly follow the flashing light sequence.
Click on some dots to start the game. There
are 12 sets in the puzzle before completion.
If an error is done, the puzzle starts over
with another random set of lights.
When correctly done, the rune is
disintegrated.
Amulet-Wittard explains again about the
Portal-Well and the need to use the amulet on the portal after all the
runes are dissolved.
Green cross symbol: Go to
the left of the eyepiece part of the telescope and look at the inner right side base of the
telescope. See
green cross symbol 11.
Elevator: Exit the observatory
and walk the hallway of the dome.
Go to power cabinet 2 and turn the valve-wheel to turn
the dome.
Walk the dome walkway to the other side area. Exit
through the broken glass door at right and be at the elevator.
Look for
runes and dissolution machines.
Medical Bay:
Go down to lobby - 0 floor. Turn right from elevator-coffee
machine. Go
through the double doors and be at shop hallway.
Go forward to end of the hallway and left to the
medical bay door.
Rings puzzle: Click on the base of the door to remove the cover
and see rings that can be moved.
Take note of the clue seen on the floor of the
unfinished apartment.
Click on a ring and it will move up one space.
Move the rings to the position of the Xs shown in the clue paper.
Hear a sound. Enter medical bay.


Look around. Go forward to the sink.
Lights go out; hear someone enter the room.
When the lights return, go to the door and hear
someone sealing the door.
Try to open the door. Amulet-Wittard warns not to touch the door. Fenrir locked you in.
He wants the amulet. Wittard says to weaken Fenrir's grip on the door - disrupt his electrical
energies.
Rune stone dissolution device:
Go to the steam machine right of the door. Open the box.
Place the double X shaped rune taken from the
finished apartment's chocolate puzzle inside the machine.
The colored fuses at right are activated.
Use the clue seen on the yellow pad at the lounge in
the swimming pool room.
Click-hold a fuse (except the top green one and
bottom red ones) and drop it
on another colored fuse to exchange their position.
The rune is dissolved. Thanks, Ludwig!


Open the door: Wittard says to
weaken Fenrir's grip on the door - disrupt his electrical energies.
Use the video camera that is in inventory at top of
the screen.
See the shade of Fenrir.
Rune: After waking up, take
reversed Z shaped rune 9
from the table. Exit the room.

Boiler Room:
Enter the door at left and be at the boiler room.
Rune stone dissolution device:
Go to the front of the right boiler. Remove the cover.
Place the X shaped rune taken from observatory inside the boiler.
Go to the side of the boiler and look close at the 3
wheel valves.
Remember Aaron's note from the observatory about how
to run the boiler.
Numbering the valves 1-3, left to right: click on 1
1 2 3 2 1. The rune is dissolved.
Amulet-Wittard congratulates you.
Bar-Cafe:
Go to the cafe and enter the bar-game room at right.
Rune stone dissolution device:
Look close at the wood table at right.
Note that the colors and arrangement is similar to
the one seen on the monitor view of the water tank on the roof.
Place the n shaped rune taken from the box in the inner
courtyard. The puzzle is activated.
Arrange the upside down cups in the position shown by the clue
on the water tank. Remove the wrong cup and place it on an empty space before
placing the correct cup in its place. The rune is dissolved.
Amulet-Wittard says that the portal is close to
opening.


Wittard's
Apartment:
Go back to the elevator. Click on door.
Security: Go to 2nd floor and
walk to security office.
Look down at base of wall left of the door. Open the
panel and flip the switch.
Find Wittard's apartment: Exit
the security office and go forward to the hallway.
The white wall is now back behind the pram.
Since we already opened the blue door at left, enter
through it and be at the foyer of the finished apartment.
Go forward to the other exit door (one we entered
through the first time) pass the kitchen to the small area with the bathroom.
Click on the ornate door right of bathroom and be in
the unfinished apartment. Go forward and exit this unfinished apartment.
Be in the small room behind the white wall with the
pram. The white wall is the back of this elevator. Turn right. Enter the elevator.
Apartment: Wittard welcomes
you to his apartment.
Go forward, turn right to hallway and hear the
elevator run. See Fenrir's
shade appear down the hallway and attacks. Get
a call from Fenrir-Kate. He says that he has broken his chains and the time of
Ragnarok is near.
Wittard's Office: Enter
through the door at left. Look around.
Look close at the desk while standing on the right
corner of the room.
Rune: Open the bottom left
drawer of the desk and take trident shaped rune 10.

Diary: Read the diary on
the desk and learn how Wittard met Odin; his contacts with Odin; why Utopia
was built, Ragnarok and the chosen one. Learn about his grandfather Roger.
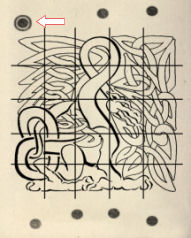
See an elaborate design at the last page of the
diary. We saw this before - the slider puzzle at the balcony of the inner
courtyard. Now we know the end design.
Panel: Look at the panel
left of the globe. Press the button and see a family tree. Not enough
information yet.
Yellow square symbol: Look
close at the Architectural Innovation Award on the wall behind the desk. See a
yellow square symbol 12.
Exit the office.
Wittard's living room: Go
to the other end of the hallway. Enter through door at left.
Wittard explains about the reason for the
design of the room. There's a rune stone dissolution device here.
Red eye symbol: Go forward
to the living room and then look up at the glass ceiling. See
red eye symbol 6 on the top of a column.
Hear children laughing - the lost children perhaps?
Studded box with papers: Look close at
the room divider on the left and see a studded box. Read the notes inside.
See a postcard of a wolf being speared and a note
about the wolf being free.
At the end of the aisle, there's a panel on the left
side of a sun mosaic wall.
Chess table: Go back to living
room. Look close at the chess table.
Read the letter from Caroline and learn about
Sophie, Jeff, Anita and Arnold.
Green cross symbol: Pick up
the white bishop chess piece. See
green cross symbol 12 on the underside of the piece.
Knights puzzle: Look close
at the chess board.
Click on the Knight to pick it up and move-click it
on any possible square that is appropriate for the L move of the Knight piece.
The aim of the puzzle is to click the Knight on all
the squares of the board.
Hear a sound when correctly done. Thanks, Ludwig!

Rune stone dissolution device:
Go to the mosaic sun wall at end of the side aisle.
Press the button at left to open the alcove. Place the trident shaped rune taken from Wittard's office on the shelf. It is dissolved.
Get a call from Fenrir. Fenrir tries to discredit
Wittard.
Exit the living room.
Wittard's Office: Go back
to Wittard's office at other end of the hallway.
Go forward to the globe at left side of room. Look
close at the panel with a small button at the base.
Press the button to see a family tree chart.

Family Tree: See Wittard's
family tree but the names are disarranged. Now that we have seen clues to his
relations, we can do the puzzle.
The aim of the puzzle is to arrange the family tree
by placing the correct name at the correct position.
The clues are from:
Wittard's diary - Roger is his grandfather.
Letter on chess table - Sister Caroline;
Grandmother Sophie, Uncle Jeff married Anita and Arnold.
Aaron's note in the observatory - Grandmother
Sophie, Great grandfather William, Great grandmother Emma and Great
grandmother Sarah.
Note in book at Security - Chart showed
Mattew as Great grandfather and Jeff is 2 generations down from him.
By elimination; that leaves Edward and Susan as
parents of Horatio and Caroline.
Click on a name and then click on the tag where you
want it placed.
If correctly done, hear a sound.

Rune stone dissolution device:
Go to the fireplace at right. Look close at safe.
Remove the fireplace guard. Open the safe.
Place the reversed Z shaped rune taken from the medical bay
inside the safe. It is dissolved.
The cell phone rings. Again Fenrir questions Wittard's
motive about the runes.
Exit the office and go to the elevator at middle of
hallway. Press the call button left of door to enter the elevator.
Go through the light blue door, unfinished apartment, finished
apartment and out through the front door to the light blue door at 2nd floor
hallway.
Turn right, go forward, left and enter the storage.
Enter the elevator at left. Go down to main lobby - 0.
Balcony at Inner Garden:
Go to connection point switch behind the elevator.
Flip the switch to the right. The switch should be at right for the balcony
upstairs to have power and left for the elevator.
Climb the spiral staircase to go up the mezzanine.
Open the double doors to the balcony by pressing the button at left.
Rune stone dissolution device:
Go right and look down at the ornate slab on the floor.
Look close and click on the stone slab.
Place the F shaped rune taken from the boiler room on the tube at base. The slider puzzle is activated.
Slider puzzle: We saw the
design of the slider in Wittard's diary.
Slider skip: Thanks to C2
As shown in Baron Wittard's diary, the drawing of the design has a different circle at top left.
After you placed the F rune at the slider puzzle; click to open the mushroom like rock at top left. See a button. Press the button and the slider is solved.


This is just one way to solve the puzzle (some maybe
way shorter).
Click on tile positions:
24, 23, 22, 21, 16, 17, 12, 13, 18, 23, 22, 21, 16,
17, 22, 21, 16, 11, 6, 7.
2, 3, 4, 9, 14, 13, 12, 7, 2, 3, 4, 9, 10, 5, 4, 3,
2, 7.
12, 17, 22, 23, 24, 19, 14, 13, 12, 17, 18, 13, 12,
7, 2.
3, 4, 5, 10, 9, 14, 13, 18, 17, 16, 11, 6, 1, 2, 3,
4, 5, 10, 9, 4, 3, 2, 1, 6, 11, 16, 17, 18, 19, 20, 15, 14, 9, 8, 13, 18, 19,
14, 9, 10, 5, 4, 3, 2, 1.
6, 11, 16, 21, 22, 23, 18, 13, 14, 15, 20, 25, 24,
19, 14, 15, 20, 25, 24, 19, 18, 23, 22, 21, 16, 11, 6, 1, 2, 3, 8, 13, 18, 23,
24, 19, 14, 13, 8, 3.
4, 5, 10, 15, 20, 25, 24, 19, 14, 15, 20, 25, 24,
19, 14, 15, 20, 19, 24, 25.
20, 15, 10, 5, 4, 3, 2, 1, 6, 11, 16, 21, 22, 23,
24, 25, 20, 15, 10, 5, 4, 9, 14, 19, 24, 25, 20, 19, 24, 25, 20, 19, 14, 9, 4,
5, 10, 15, 20, 25, 24, 23, 22, 21, 16, 11, 6, 1.
The rune is dissolved. Amulet-Wittard talks.


Front Desk:
Go down and go to the front desk. Go behind the
counter and look close at safe.
Rune stone dissolution device:
Open the safe now that we saw all the colored
symbols around the building.
There are
12 green cross symbols,
1 blue diamond symbol,
12 yellow square symbols and
6 red eye symbols seen throughout
the building trek.
Click to turn the safe dial wheels so that the white
arrow of that colored wheel points to the correct line-number.

Open the safe. Place the diamond with tails shaped rune taken from the swimming pool
reservoir inside the safe. The last rune is dissolved.
Amulet-Wittard says that next step is to return the
amulet to the portal.
Chained door:
Go down to the basement boiler room. Look down on
the manhole on the floor in front of the boilers.
Go down through manhole. Go forward through one
door. Go forward and right through the ventilation shaft.
Turn around from the ventilation grill. See that the chains are off the door. Amulet-Wittard
says it's safe to open the door.
Open the door and see Fenrir by the portal absorbing
the energies that makes him stronger.
Amulet-Wittard says to open the amulet and do one
last puzzle. Then cast the amulet to the portal to seal it and chain Fenrir
again.
Click on the amulet. See that the cover is pushed
aside.
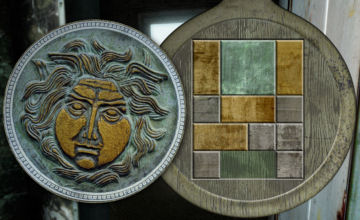
See a release the tile puzzle. The object of the
puzzle is to move the tiles to get the large green tile be at bottom center of
the frame.
The reset arrow is at top right of the puzzle frame.

Solution from Alan: (Thanks, Alan!)
Number the grid like this:
1 2 3 4
5 6 7 8
9 10 11 12
13 14 15 16
17 18 19 20
move the blocks from the first number to the second. If a block covers more then 1 square of the grid, the numbers stands for the top left corner.
17-19 13-17 15-13 10-14 12-11 11-10 16-11 4-12 2-3 1-2
9-1 13-5 10-9 14-13 11-10 12-11 20-12 19-16 17-19 13-17
10-14 2-6 14-13 6-10 1-6 5-2 9-1 13-5 10-9 11-10
12-11 11-15 3-7 2-4 1-3 5-1 6-2 9-5 10-6 17-13
19-17 15-19 16-20 7-11 3-7 4-8 2-4 1-3 5-1 6-2
13-9 17-13 19-17 20-18 11-15 9-11 13-9 17-13 18-17 15-14
Amulet-Wittard congratulates you on activating the
amulet. It is time to seal the portal and cast the amulet.
Fenrir talks about Wittard and tells you to take the
amulet with you.
Choice:
SAVE GAME HERE.
It is your choice now, cast the amulet on the
portal or take it with you.
Either way, after your decision exit to go back to
the gate. Turn right and go down the hallway. Climb the metal rungs.
Turn around and go to the courtyard.
Go right of the excavator and forward to the gate.
Click on the warning ribbons tied on the gate.
Kate your editor will call. Depending on your
choice, new dialogue is added after the initial statements.
This document may not be
distributed without express written permission of the author and the content may
not be altered in any way.
For
Questions or Comments on this Walkthrough,
Please write to:
MaGtRo
Copyright © 2/2011
MaGtRo
 GameBoomers
Walkthroughs and Solutions


