Deponia
by
EuroVideo and Daedalic Entertainment
Walkthrough by
MaGtRo July 2012
Gameplay:
This is a third person point and click game.
The main menu has
continue, new game, load/save, settings, bonus, credits and quit
game.
To save a game select
the save page. Click on a blank frame and then click on save button at right.
See the picture on the frame.
The settings menu has
speech volume, music volume and sound effects volume adjustments. There are
also selections for subtitles, full screen mode or window, high resolution
videos and inventory opening choice (one click or mouse).
Bonus has the videos
in the game.
The main menu is accessed by the ESC key during
gameplay or by the disk at top left of the inventory page.
ESC key also skips the cutscenes
during gameplay.
The inventory can be
access by pressing-scrolling the mouse wheel or click it on inventory screen
seen as a handle at top right. Use the green switches at right to scroll
through the next pages of the saved games.
Pressing the space bar
shows the hotspots in the game screen.
To save a game, select a frame and then click the
action wanted at right of screen. Then select the check mark. Saves can be
overwritten or deleted.
The cursor has 2 gears that show an icon of the
action of those gears. The left gear is activated by left mouse click and the
right gear by right mouse click.
The manual is located in the installed game folder -
documents folder. Have fun reading it.
Tutorial:
Rufus and Wenzel show
the stinking tutorial for the game by fixing the junk press.
Click to continue
Rufus' dialogue to learn gameplay manipulations.
To see an item, right
click to use the eye icon. Look at yin on the floor
Pick up the yin
item on the floor. There's a yang already in inventory.
Click on Wenzel to
continue the tutorial. Learn inventory, combine item in inventory and how to
end a dialogue.
Fix the junk press:
In inventory combine the yin and the yang to get a spare
part.
Use the spare part at
inconspicuous slot of control panel.
Press the button at
left. The intro follows.
PART 1 - KUVAQ
Leave Kuvaq.
Pack the suitcase:
Rufus' room:
Rufus is getting ready to leave Deponia. He has a plan.
Open the suitcase on
the bed to find the list. He needs provisions, toothbrush, socks and
bolt cutter.
Look around.
Check (right and then
left click) the cushion on
the bed to get green sock.
Check the old escape
plan on the wall and trunk at right.
Pick up the torch
and the oil can under the porthole window.
Living area -
middle floor: Exit to living area.
Check the first aid
kit.
Open the door to
Toni's room. Enter and nearly get guillotined. Take the severe slip
tacked on the guillotine.
Take the chafing
chit on bathroom door at left. Open the bathroom door. Take the plunger
from the bathroom door.
Try to take the
toothbrush from the cup left of the sink. It hops away and hides at the dark
corner by the ramp. Check the washbasin.
Open the locker door
left of washbasin. Take the detergent and the bolt cutter.
Check the toothbrush
at the dark corner. Rufus needs a better plan.
Living area -
bottom level: Go down the ramp to the lower level.
Check the closet right
of the sink. It's missing a handle and the cracks are too small. Use the
plunger from the bathroom on the closet. A panel is removed.
Check the mouse hole
to get - ouch - a mouse trap.
Check the sink. Press
the button and automatically take a pot with water. Take the
malicious memo and the fork.
Check the refrigerator
and take the bitching post-it. Open the fridge and take the yellow
sock.
Check Toni's coat
hanging close to the front door. Get a blue sock.
Get provisions:
Check the crumbly sofa.
There are some wasabi
peas in there but Rufus needs a container.
Use the can o'used oil
on the sink to get empty can.
Use empty can on
crumbly sofa to get provisions (can of wasabi peas).
Take the nagging
note.
Get socks:
Look at one of the 3 socks in inventory. Rufus wants a pair of socks.
Place the pot with
water on hotplate of oven right of sofa.
Open the oven at
bottom. Place the bunch of notes inside the oven.
Use the hand torch on
the memos-notes in oven to get fire. The water heats up.
Use detergent on the
pot on top of the stove. The water bubbles.
Place the 3 socks in
the boiling soapy water.
Use fork to agitate
the washings. The color of the socks change and one sock is lost.
Automatically, get a
pair o' socks.
Get toothbrush:
In inventory combine the mouse trap with the provisions to get trap with
bait.
Use trap with bait on
the toothbrush in the dark corner and get the toothbrush.
Pack the suitcase:
Go back up to top level - Rufus' room.
Use the bolt cutter,
provisions, pair o' socks and toothbrush with the suitcase. Check!
The suitcase cannot
be closed. Click the bolt cutter from the list. Packed and ready
to go.
Prepare the pod:
Wenzel and Rufus
discuss the failed escape attempts of Rufus. Wenzel warns Rufus that the
Organon is always on time and might catch Rufus.
Open the door of the
pod.
Store the suitcase: Try to
place the suitcase inside the pod.
Open the storage space below the seat. Take the battery out.
Place the suitcase in the storage space.
Check the battery.
Where should I put it?
Take the wrench
leaning on wall right of the ramp.
Outside Toni's house:
Enter Toni's house. Exit through the door at left at lower level to be in front
of Toni's hut.
Look around outside.
Talk to Hannek standing by tunnel entrance.
Check the chili pepper right of the door and the
doorbell.
Check the mailbox. Use
the wrench on the screwed tight mailbox.
Where to place the
battery: Go back inside Toni's house and then out the door at
middle level to be at back of Toni's house outside.
Use wrench on seat of
the pod to get seat.
Use mailbox on base
plate where the seat was.
Open mailbox and place
the battery inside. There the capsule is ready.
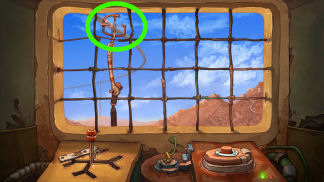
Calibrate the harpoon:
Go to the control panel at right.
See a close up of the
grid screen with the crosshair. A skip X is at top right of the screen.
The lever to move the
crosshair is at left and the reset button is at right.
The aim is to get the
crosshair to the flashing bars-markers of the railway at second from left top
row.
Click the slot location arrow of the lever to move the
cross hair to the intended target at top left:
left down, top right, left down, top right, left down, bottom right, top right,
left down and top right. I did it!
Talk to Toni. Toni gives
a letter to Rufus.
And away we go:
Light the fuse at side of the control panel with the torch.
Rufus reads the letter
given by Toni. Screws? OUCH!
Meet an Elysian pixie.
Cruiser:
Landing:
A cruiser travels the rail line. Rufus is hanging on the chains attached to the
harpoon that hit the cruiser.
Click twice on the
chains and then enter the chute.
See that the suitcase is
here. Open the suitcase and take the socks and provisions-wasabi.
Look around. See that
this is the refuse disposal area of the cruiser. The trash is loaded on the right chute.
Chutes:
There are 3 chutes that have hatches at the bottom. The middle chute's hatch
doesn't have a grill cover and shows the turning cog wheels.
Check the hatches at
bottom of left and right chutes.
Check the hatch-cabinet on left side of the middle
chute.
Open the hatch of the
middle chute: Use provision-wasabi on the cogwheel of the
middle chute to block it. See a maintenance arm comes out from side hatch and fixes the
blocked cogwheel.
Use the sock on the
hatch cover itself - not on maintenance arm. Repeat until you can place the sock
on the hatch cover.
Now open the hatch and
take the robot arm.
Open the left chute's
hatch: Use the robot arm on the hatch of the left chute.
A hole on the grill is
made.
Ms. Goal:
A real live Elysian
pixie, Ms. Goal arrives above. She is confronted by the Bailiff. They await the
Prime Controller to deal with Ms. Goal. They have a plan for Ms. Goal.
Rufus to the rescue:
Enter the hole on the grill of left chute.
Rufus is now at the
levers at left. Use left or middle lever and see what happens.
Ms. Goal falls inside
the middle chute. Rufus is eventually caught and thrown off the cruiser.
Find Ms. Goal:
Rufus lands at the
village gate on an overlook with a view of the trash heap of Kuvaq.
Look around and check
the bulletin board, bull and the truck at right. The locked truck has a dirty
windshield.
Go to the right to be at
Village Center.
Town Hall:
Go right to where the people are gathered.
Talk to Lotti the
receptionist. Talk to the 3 men (Lobo, Gonzo and Micek) sitting in line. Learn
that Ms. Goal is here and they are waiting for the mayor to decide who will give
her shelter. Ms. Goal is at the assembly hall.
Learn about their hats.
Take note of the hats they are wearing. The roofer started making hats.
Pull the lever of the
machine behind Rufus and take the waiting number from the dispenser.
Take the magnets
from the bulletin board at left.
Assembly hall:
Enter the room at end of the hallway. See Goal at the stage.
Learn that Gizmo holds 3 positions at the emergency station. Right now he is a
doctor. Learn that Goal needs strong coffee to wake her up.
Exit at right and check
the doorknob left of the entrance to the stage. It opens the closed door.
Check the cardboard box
and take balloons.
Alley:
Exit town hall and enter the alley at left.
Talk again to Hannek.
Learn about the detonation plan.
They are trash hunters. Hannek has a
collection of car keys.
Learn about the parrot. Talk to the parrot and learn
that Hannek's wife talks to it. The parrot repeats what the wife said.
Check the detonation
plan and blast signal.
Lonzo's bar:
Enter the bar behind the parrot.
Talk to Lonzo
completely. Lonzo thinks about getting a strong brew. Lonzo shows his impressive
espresso machine behind the red curtain.
Rufus picks up the
recipe for highly concentrated coffee. Lonzo will make the coffee if Rufus
brings the ingredients.
Look at the recipe in
inventory. Move the cursor on each of the ingredients to see what is needed:
energy rich water, clear water, stimulant, black powder, hot bean and
revitalizing fluid.
Talk to Lonzo again to
get clues where to get the ingredients.
Take the cow poster
right of the bar, the red curtain from the floor and the dart from
the target left of door.

Make espresso.
Search for tools and
ingredients at emergency station:
Get stimulant.
Remember what Lonzo said: Dr. Gizmo might have some
highly stimulating item in his office.
Emergency station: Exit the bar and hear a sound that signals that the Emergency Station is now open.
Go to the Emergency Station at right. Look
around.
See a lever by the
entrance. The lever has 3 settings: top green, middle blue and bottom red. Right
now it is on top green.
There is circular
cabinet behind the chair that has 3 lights also. Right now it is on green doctor's
cabinet.
There is a porthole at
top of the cabinet that shows the contents of the next box in the cabinet.
Medical setting:
The top green shows the medical set up inside the cell at right.
Go to the cell and take
the dentist's drill and the dissecting scalpel from the tray
beside the bed.
Check the happy laughing
gas. Use a balloon on the laughing gas tank to get balloon to automatically get
a balloon full of nitrous oxide.
Check the doctor's
cabinet behind the chair. It's locked.
Police setting:
Pull the lever to middle position or at blue setting.
See a handcuff on the
blue cup above the desk.
Check the porthole on
top of the cabinet and see the fire extinguisher inside.
Check the barred cell
and see a lock pick that Rufus inserted there for emergency at side of the bed.
Check the police box
left of the cell. The box has foot fetters and it falls on the floor.
Firefighter setting:
Pull the lever to bottom position or the red setting.
Take the asbestos
gloves from the wall of the cell.
See a fire escape at
center of the floor. The floor-hatch is pulled out of the cell and see a small hole on
the part that is outside the cell.
Go down the fire escape
and see that it comes out on the overlook by the village gate. Go back to
village, alley and the emergency station.
Check the fire fighter's
cabinet at left of cell. Pull out the fire extinguisher. It is laid on the floor
with the foot fetters from the police setting.
Lock the fire escape
hatch in place: Pick up the foot fetters and use it on the
small hole of the floor-hatch. Rufus says the fetter is too wide.
Place the foot fetters
inside the empty firefighter's cabinet.
Pull up the lever to
middle blue police setting. The baskets on top come out and the foot fetter
falls off the hole on top knocking the handcuffs off the blue cup.
Take the handcuffs
from floor.
Pull down the lever to
bottom red firefighter setting.
Use the handcuffs on the
hole of the retracted hatch-floor close to the tree.
Rufus will lock the
floor on the pole. The fire escape floor is now fixed.
Get the lock pick:
Pull the lever to police blue middle setting. See that there is now the hole on
the floor.
Go outside, then to
front of village gate and climb up the pole on the left to be inside the jail
cell of the emergency station.
Take the lock pick
from the side of the bed.
Go back inside the
emergency station via the hole on the floor and village center.
Get stimulant:
Pull up the lever to medical green top setting.
Use the lock pick on the
medical cabinet.
Take the syringe
and stimulant. The stimulant is checked off the recipe in inventory.
Get hot bean and black powder:
Check Toni's store
and house:
Toni's store:
Go outside to Village Center. Go to Toni's store at bottom right.
Look around. Talk to
Toni. Learn about the post office gift vouchers on the counter.
Try to take the
voucher's left of the counter. This pushed Toni to the limit and she has to
meditate. Try to take a voucher again.
Go to the right and take
a hook from the jar at right counter. Rufus gets hooks on his hands and
is hurt. Toni gives the key to the first aid kit at home.
Check the grinder left
of the door and the pole right of the door.
Exit the store and go
down to village center.
Toni's house:
Go left to Toni's hut.
Get hot beans:
Try to take the chili peppers on the pot right of door. Rufus' hand gets burned.
Use the asbestos gloves
on the chili peppers. The hot beans box is checked off the recipe in
inventory.
Enter the house. Go to
middle level and use the key to the first aid on the cabinet left of Toni's
bedroom.
Take the tranquilizer.
Get black powder:
Exit outside to the back of Toni's house through door right of Toni's bedroom.
Take the funnel, torch and dud from floor.
In inventory, use the
scalpel with the dud to get black powder. The black powder is checked off
the recipe in inventory.
Exit the house and go
back to Village Center.
Get the 3 kinds of water.
Water reservoir:
Go left to the water reservoir at left of alley.
Check the chimney of
Wenzel's house. The chimney has a protective cover.
Push the pipe and it
goes around the Water tank.
Pull the chain-tap of
the reservoir and see that water comes out.
Check Wenzel's house:
Wenzel:
Go back down to lower level.
Enter Wenzel's house left of Toni's house. Learn that Wenzel took Rufus' things.
Talk to Wenzel and learn
about the divining rod that Rufus' father left him.
Learn clues about where
to get the ingredients: clear water, revitalizing fluid (blood of a bull) and
energy rich water (car battery).
Try to take the divining
rod on the table. Wenzel would not give it back.
Get the divining rod
back from Wenzel:
Bathroom:
Go to bathroom at top left. Look around.
Take the sponge
under the window.
Remember the pipe of the
water reservoir and the chimney of Wenzel's house.
In inventory combine the
hook with string with the balloon full of laughing gas to get balloon with
hook.
Check the furnace. Use
the balloon with hook inside the furnace. See the hook hold the chimney
cover up. Leave the furnace door open.
Basement:
Go back to living room and then to the basement.
Check the pipe and learn
that the pipe is under the shower.
Use the dentist's drill
on the lower pipe and Rufus makes several holes.
Exit the basement and
the house.
Water reservoir:
Go to the water reservoir above Wenzel's house.
Push the pipe. The
raised lid holds the pipe in place above Wenzel's chimney.
Pull the tap of the
reservoir. Water flows through the chimney, sink and then basement.
Go back to Wenzel's
house.
In the basement, Rufus
realizes that Wenzel did strike a well as shown by the clear water on the floor.
Wenzel left to go to
town hall. Take the divining rod at left.
Click on the well's
clear water. Rufus refuse to have anything to do with the clear water from the
well.
Exit the house.
Get to see the mayor:
Alley:
Get the 3 men waiting in line to go away: Remember that Lobo,
Gonzo and Micek are ahead of Rufus in line to talk to the mayor.
Go to the alley. Talk to
Hannek again about the detonation plan.
Use the magnets taken
from the town hall bulletin board on the detonation plan by the entrance.
See the picture of the
town in a grid. Place the 3 magnets on the house of the 3 men in line to talk to
the mayor.
Take note of the roofs of
the houses. Remember that the roofer now makes hats. Select the 3 houses with
roofs similar to the hats worn by the 3 men - Lobo, Gonzo and Micek.
Place the magnet on the
2 at middle top and one at middle bottom of the picture.
Click on the blast signal
bell. Hannek yells the warning.
Town Hall:
Go to town hall. See that the 3 men are gone.
Pick up the #63
number from the floor.
Wenzel comes out of the
Mayor's office. He believes that he is selected to take Goal home.
Lotti calls out for #63.
Mayor's office:
Enter the mayor's office. The mayor is not around.
Lotek the mayor comes
out from the drawer of the desk. Learn about Rufus' father and the manipulation
of the planet's magnetic field.
Talk to the mayor. The
hearing for the Elysian girl is over. End the conversation.
Check the teletypewriter
and read a message from the mayor of Booza Westvoq - O O I C U R N E D O T.
Hahahaha.
Find hidden clear
water:
Remember what Wenzel
said; that there are several bottles of clear water hidden by Rufus' father at
the mayor's office.
Look around. Ring the
bell and see that the drawer is now empty.
Click the globe at left.
The globe opens to show that there's a keyhole and a glass. Take the glass.
Check the water emblem
in front of the desk. It is similar to the one on the divining rod.
Use the divining rod on
the symbol. A secret compartment opens. Take the key.
Use the key on the
globe-booze cabinet.
The liquor cabinet on
the wall opens. Check the booze and it reminds Rufus of his dad's aftershave
lotion.
Take the booze.
Get the energy rich
water of the recipe:
Remember the clue about
energy rich water - battery water has energy.
Get the keys for the
truck: Remember the truck with a dirty windshield by the
village gate.
Go to Toni's house.
Check the pot of soapy water above the stove.
Use the sponge from
Wenzel's bathroom on the soapy water to get wet sponge. It will
automatically be in inventory.
Go to the village gate.
Use the wet sponge on the dirty windshield of the truck.
Look through the
windshield and see: pink leatherette seats, puppet pirouetting and the name
Sugarpuff.
Go back to the alley and
talk to Hannek about keys.
Answer Hannek: Sugarpuff
for the name, pink for favorite color and ballet for hobby.
Hannek gives the
truck keys.
Get energy rich
water: Go back to the truck at village gate. Use the truck
key on truck door.
Pull the lever to
release the hood. Open the hood.
Check the battery. Use
the dentist drill on the battery.
Collect the battery
water with the glass from the mayor's office to get glass of energy rich
water. The energy rich water is now checked off the recipe.
Get revitalizing
liquid:
Remember the clue about
revitalizing liquid is something that brings life to an inanimate object.
Check the bull. Place
the sign with picture of a cow on the bulletin board beside the bull. The bull
turns to it.
Check the bull and Rufus
says to get the bull pumping.
Place the red curtain
from the bar on the bulletin board. See the blood of the bull starts pumping.
Use the syringe from the
emergency station on the bull. Rufus rides the bull and gets syringe with
taurine. Bull's blood-check.
Combine the liquid
part of the recipe:
In inventory combine the
syringe + taurine with glass of energy rich water + booze to get energy rich,
revitalizing and clear water.
Combine the coffee
powder part of the recipe:
Go to Toni's shop. Open
the grinder left of the door.
Place chili pepper +
black powder + stimulant in the grinder.
Turn the crank at right.
Open grinder and take the Rufus Reckless, the maiden slayer-coffee powder.
Make the espresso:
Go to alley and then
Lonzo's bar.
Use the coffee powder
and energy rich, revitalizing and clear water on the coffee machine.
Lonzo does his thing.
This is an august event. The lights go out.
Rufus takes the
espresso from the machine.
Revive Goal.
Wake up Goal:
Go to Town hall. Overhear Gizmo say that Goal's
implant is broken.
Try to give Goal the espresso at assembly hall. Gizmo
stops Rufus from giving the "medicine".
Distract Gizmo: Remember that
Gizmo is also the firefighter as well as police and doctor.
Use the hand torch on the cardboard box under the "no
fire" sigh in the cabinet at corner at bottom of stage.
Fire! Fire! Firefighter mode activated. Gizmo
enters the chamber and Rufus locks him in.
Go back up on stage and now try to use the funnel on
Goal. Wenzel and Lotek stop Rufus.
Distract the mayor: Take the
stethoscope from the podium. Gizmo exits the burning chamber and comes back on
stage. Back as the doctor Gizmo looks for the stethoscope.
Use the stethoscope on the Mayor Lotek when possible. An
argument ensues between the thieving mayor and Gizmo the policeman.
Give espresso to Goal: Then
when possible, use the funnel on Goal. Then give the espresso to the sleeping
Elysian girl. Goal wakes up and after learning about Rufus, she punches him.
Talk to Goal: Rufus wakes up
in the emergency station. Talk to Goal. Goal talks gibberish. We need to go
back to Elysium. The Organon betrayed us. Is that you, Cletus?
Learn that Cletus is her fiancé. Cletus will reward
Rufus generously. Contact Cletus, maybe on a radio.
Contact Cletus.
Look for a radio:
Go to town hall and talk to Lotti, the receptionist.
Learn about where to make a radio call. She-he says to talk to the operator in
the post office. The post office is closed.
Open the post office:
Post Office opening hours:
Check the white machine left of Lotti. It is missing something on the machine -
what o'clock. Hmm...
Go to assembly hall and then stage. See Lotek the
Mayor asleep on stage.
Take the funnel from floor.
Take the watch-clock from the mayor's vest.
Go back to Lotti's area. Use the clock-watch on the
white machine left of Lotti to get an opening hour of the post office. The post
office is now open.
Find out where there are radios:
Enter the post office.
Talk to the robot operator-postman completely.
Registered private devices are for local calls only. There are 3 local devices only:
mayor's office, reception desk and emergency station. The long
distance devices are at the listening post of the post office and vault. They
are not cleared for public use. The
vault is off limits to the public.
Learn that the robot has fun popping bubbles of the
bubble wrap. He only handles the bubble wrap when padding a smaller
package that accidentally is packaged in boxes of postage level #3.
Learn that the scratching noise comes from the postal
service replacement cats behind the hatch at left.
Look around post office:
Check that the vault is the dark room above the
robot's desk. See a nodding bird and a radio that needs a headphone and
microphone.
Check the 2 hatches right of the robot and by the ramp
to outside. See cats inside the hatches. The one on the left is in a hamster
wheel and the cat on the right licks stamps. Rufus says that says that a bit too
slow and bit too fast and the package gets the wrong postage.
Check the replacement cat's hatch at bottom drawer of
the numbered mailboxes on the left. The robot's light comes on and entrance
there is not allowed.
Look around the operator's platform (listening
post): Go to the operator's platform left of the entryway;
the other one aside from the vault that has a long distance radio.
Talk to the telephone operator. Learn that Cletus has
been calling. Learn that the radio station is for postal services workers only.
The operator would not lend his earphones and he
doesn't get tired.
Learn about the messenger pigeons and how they are
affected by the magnetic field.
Pigeons: Check the 3 pigeons
at right.
See that 3 pigeons are 3 different sizes in 3
different sized holes with labels of 1, 2 and 3 stamps.
Go down to the post office.
So now we need to get the robot out of the way to
access the vault and get headphones and mic to use on the radio.
Find out how the mail goes through the post office:
Get the vouchers from Toni:
We need to see how the mail goes through the post office.
Go to Toni's shop. Outside the store, check the
window.
In inventory, combine the dart with the tranquilizer
taken from Toni's first aid kit to get prepared dart.
Combine prepared dart with funnel to get blow pipe.
Use blow pipe on window of Toni's window. Toni is hit
and becomes mellow.
Enter the shop and take the vouchers left of the
counter. Rufus pushes his luck.
Find out how the mail goes through the post office:
Go back to the post office and give voucher to robot postman.
One light lead weight mail is sent. See the orange cat powers the conveyor belt. The white cat places stamps on the package and sends it through to the postman. The postman checks the package.
A small pigeon from small hole is engaged to deliver
the package. Ah...
Get the robot out of the way:
Remember that the postman has a thing about bubble
wrap. He only uses a bubble wrap if a small package is sent through as stamped
package 3.
Sabotage the pigeons:
Mayor's office: Remember that the pigeons are affected by
the magnetic field.
Go to the mayor's office across the hall from the post
office.
Open the drawer by pressing the bell on the desk. If
the top drawer is over the mayor's bed, use the divining rod on the water
emblem. The bed goes out.
Check the cushion and take the planet's magnetic
field machine.
Change the magnetic field:
Remember that the pigeons are in labeled holes and the largest pigeon is in hole
3. The smallest pigeon is in hole 1.
Go back to the post office and up to the operator's
platform.
Open the cupboard below the pigeons. Place the
planet's magnetic field machine inside the cupboard.
Look close at the machine in the cupboard and see the
puzzle.
If the puzzle is not random - the machine has one lit bar on the left, 3 at
middle and 2 at right. These correspond with the pigeon holes' labels-stamps.
The object of the puzzle is to get one lit bar at
middle column. This will get the smallest pigeon from hole 1 on the left to be
inside the largest middle hole.
There is a leave arrow and puzzle skip X at top right.
There are 4 circles in the puzzle. If the middle
button of a circle is lit; it will turn that circle when clicked on.
The aim is to get the middle column of buttons to have
only one lit button.
See the pigeons change holes when the lit bars above are changed.
The puzzle might be random. You can skip the puzzle or if
your puzzle is the same as bottom picture; then do:
Press C once, B twice, A once, B twice, C once, B
twice and D once. Pull back.
See that the little pigeon is now inside the middle
largest hole.
Go down to post office.
Sabotage the cats: Remember
that the speed of the conveyor belt depends on the orange cat and the number of stamps
depends on the white cat.
Give the white cat espresso twice to speed it up and give the orange cat
tranquilizer to slow it down. Oh boy! (Thanks to gamers!)
Sabotage the robot postman:
Give the postman the vouchers. Watch what happens to
the sabotaged cats and pigeon. Error! Error! Bubble wrap initiated.
The little pigeon from large hole flies out with large
package and crashes. The dropped package releases the bubble wrap on the floor.
Go to the bubble wrap and walk all over it several
times to pop the bubble wrap. Watch the postman. Error! Error!
Rufus exits the post office. Go back in. See the robot
postman having his fun.
The vault:
Open the replacement cat's hatch at bottom left of
counter and take the two replacement cats.
Open the vault door: Go behind the
counter and check the note on the vault door.
Check the clock face-dial on the door. See that it has
1-9 numbered keypad. Click on bottom bar to pull back.
Check the note in inventory and see that it has holes
on the note.
Overlay the holed note on the numbered mailboxes on
the left wall.
See the holes have numbers showing through now:
360 (1) - 116 (3) - 245 (2) - 489 (3).
The number on the note is the position of a certain
number seen through the hole.
So #1 of 360 is 3; #3 of 116 is 6; #2 of 245 is 4 and
#3 of 489 is 9.
Press 3, 6, 4 and 9 on the keypad of the vault door.
Rufus in the da house.

Check vault: Take the nodding
bird. Check the vault. It needs headphone and microphone.
Get microphone and headphone:
Microphone: Go to the
assembly hall and then stage. Take the microphone from the podium.
Headphone: The phone operator
has the headphone and will not lend it.
Get a parrot: Go to the alley
and see the parrot. Talk to the parrot. (This can be asked-done in an earlier dialogue with Hannek in the game).
Talk to Hannek about the parrot and must have learned
the words from his wife.
Go to the emergency station. Use a balloon on the
laughing gas tank to get balloon full of nitrous oxide.
Use balloon full of nitrous oxide on the parrot at
alley. Hannek gives the stunned parrot.
Get a talking parrot: Exit the
alley.
Give the stunned parrot some espresso to get parrot.
Enter Toni's shop and place the parrot on the pole by
the door.
Toni starts talking to the parrot about Rufus'
indiscretions/crimes.
Enter the shop again. Take the talking parrot.
Sabotage the phone operator:
Remember that the phone operator handles all local radio calls. There are 3 local
radios in the village.
Go to the emergency telephone at Village Center. Use
the parrot on the emergency phone at center of the Village Center walkways. The parrot starts to repeat all of Rufus'
crime to Gizmo the policeman. Now the line is busy.
Go to the mayor's office. Check the teletypewriter.
Use the replacement cat on the teletypewriter. The cat presses the button of the teletypewriter continuously.
Now, place the nodding bird on the communicator on the
desk. This then presses the button continuously.
That covers all 3 local radios. It should keep the
phone operator busy.
Go to the phone operator via the post office. See that
his nerves are frazzled. Take the headphones from the table.
Contact Cletus:
Go back down. Go to the vault. Place the microphone
and headphone on the radio.
Use the radio. Rufus contacts Cletus. Talk to Cletus
completely.
After the convincing Cletus to take him to Elysium,
they are going to meet after sunset tomorrow at Lower Ascension Station. Cletus will be on
top of the platform.
Get Goal:
Emergency station: Go to emergency
station. Check the bed sheet in medical mode cell.
Gizmo locks Rufus in jail because of the report done
by the parrot. The cell is now in blue police
mode.
Bailiff Argus of the Organon Prime Administration and his paratroopers
arrive. They want to know where the Elysian woman is now. Gizmo tells him that
Goal is in Wenzel's house.
Escape jail: Use the
remaining cat on the tree at the corner.
Gizmo goes into his red firefighter mode and tries to
rescue the cat.
Rufus escapes through the hole on the floor of the
firefighter mode cell.
Wenzel's house: Go to Wenzel's
house under the water reservoir.
See Wenzel in his bathrobe. Rufus opens the shower and
sees Toni.
After some discussion, Rufus heads to the basement
where Goal is.
Save Goal: Enter the
basement. Open the cupboard and Goal falls out of the closet. Rufus lays her on
a wheelbarrow.
Bailiff Argus and his paratroopers enter the house and demands
where the member of the resistance is hidden.
Use the divining rod on the basement door. Argus
forces the door and the divining rod flies out the window.
The divining rod embeds in the magnetic force machine.
This causes the magnetic force to be altered tilting the world. The demolition
map tilts; ringing the alarm bell and moving all the magnets to the left lower
corner which happens to be Wenzel's house. Kaboom!
Rufus is seen pushing the wheelbarrow with Goal on it.
PART 2 - GARBAGE MINE
Look around the garbage mine loading area:
Rufus arrives with an unconscious Goal. Look around.
Cross the bridge and the bridge collapses; leaving Goal
at other side of the trash heap.
Check the crane: Go to the
crane at right.
Use the crane lever and see that it doesn't work.
Open the maintenance box at left. Take the defective
fuse and Rufus throws it out.
Check the funnel and the crane arm. This is the way to
get Goal to this side of the bridge.
Look around the mine railway control building:
Enter the tunnel at far right.
Mine bike: See a rail car-mine
bike that can be used to transport Rufus and Goal.
There is something missing in the rail car and it sits
on this side of the tracks.
Click the mine bike several times to get Rufus ride it
and try to start the bike.
Take the halogen lamp of the mine bike by
clicking on hotspot left of the front tire.
The shunting lever box left of the rail car does not
have a lever.
There is a junk heap right of the rail car.
Control Center: See that the
control center is on the top floor.
A lever, button and signaling light are to the left of
the Control Center.
Look around the viaduct:
Go right to the viaduct.
Skeleton: See a
skeleton hanging on the rail guard.
Check the skeleton and Rufus pulls the leg of the
skeleton off.
Check the key hanging on his neck. Too high.
Check the maintenance hatch of the rail guard. It is
closed.
Take the dirty mirror at entrance of the tunnel
(Outer Turn).
Check the signaling light base. It has a red lamp.
Take the red signaling lamp.
Outer turn: Enter the tunnel
at right and see that it is dark.
Fix the mine bike:
Doc: Talk to Doc. He owns a
small store at the Floating Black Market. He is a handyman, spare parts dealer and brain
surgeon. There's booze beside him.
Lower Ascension Station is behind the mountain of
trash here and behind the unbeatable mine maze.
Learn how to fix the mine bike by asking about
interesting challenges.
Doc says that the avial power inverter is shot
and gives him one.
Learn about women (and power inverters). Doc gives
hints that will help later in the game.
Mine bike: Go back to the
left.
Use the avial power inverter on the mine bike. The
inverter flies off and lands in the junk heap.
Check the junk heap. Rufus accumulates parts of the
power inverter.
Put together the power inverter:
See a close up of several parts of 3 power inverters.
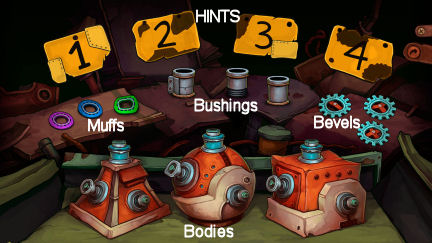
At top are 4 hints given by Doc about women (and power
inverters).
The body: At left is conical
corpus; middle is spherical corpus and right is edged-cubical corpus.
The parts: At left are colored
muffs; on the middle are clamp bushings and at right are bevels with spokes.
Click on the hints on top and use them to put the
correct parts on the right body (corpus).
Hint 1: You can attach a
screw bushing to a spherical body but never a clamp bushing to a cubical one.
-
Place the screw bushing on the spherical body.
-
Place the push on bushing on the edged cubical body
-
Place the clamp bushing on the conical body at left.
Hint 2: As long as the mauve muff
has to stay attached to the cubical body; there will never be an avial power
inverter with a mauve muff.
-
Place the mauve colored muff on the cubical-edged
body.
-
Place the square green colored muff on the spherical
corpus with the square holder.
-
Place the cobalt colored muff on the conical corpus.
Hint 3: A dorsal power
inverter still has more spokes on the bevel than a bi-nausal one.
Hint 4: 4 spokes: screws; 2
spokes: clamps.
-
Place the bevel with 4 spokes on the screwed spherical
body.
-
Place the bevel with 2 spokes on the conical body at
left.
-
Place the bevel with 3 spokes on the edged cubical
body.
The 3 power inverters:
-
Spherical is the dorsal power inverter
-
Clamped one is the avial power inverter.
-
The edged cubical one is the bi-nausal power inverter.
Use the avial power inverter on the mine bike.
Upper level:
Go to upper level: Drive the
mine bike. Move cursor to right to get set off arrow and drive around the
railway.
See a lever on a turn during the joyride.
Rufus ends up at the control center building again but
facing the other way.
A switch drops down. Click on the switch. The motor
bike is raised to the upper rail way and in the control room.
Control room: Look around.
Press the green button on the stand left of the bike.
It says that you cannot take off the railway because it is not heavy enough.
Check the control panel rail way map. Duh!
Check the locked key box at left.
Take the red cloth at left.
Upper tunnel: Walk to the left.
Check the white signaling light above the entrance and
it is a "go".
Move the lever and the lights are powered.
Push the button and a secret passage is opened. Rufus
goes down to lower level.
Go back up and then right to the control center and
the mine bike.
Ride the bike and set off. See the lever again. Be
back at the bottom railway. Dismount.
Bring light to the tunnel-Outer Turn:
Skeleton: Go right to the
viaduct.
See that the skeleton is lowered when the bar of the
rail guard is lowered by the lever at the upper level.
Take the key of the trackman.
Clean the mirror: Remember Doc
said to take a swig from his booze.
Drink booze. Rufus tells Doc that he has Herpes. Doc
wants Rufus to wipe the bottle clean.
Use the red cloth from the control room on booze to
get cloth soaked in alcohol.
Use cloth soaked in alcohol on dirty mirror to get
clean mirror.
Direct light into tunnel: If
you haven't taken the red lamp from light base above Doc do so now. Replace it
with white halogen lamp taken from the mine bike.
Use clean mirror on skeleton. It is too low to direct
the light inside the tunnel. (If we use the lever in the control panel it will
turn off the power to the lamp and raise the skeleton).
Go left back to tunnel and then walk up to the upper
level. Go right to Control room.
Use the key from trackman on the key box at control
room to get wrench.
Walk back down and back to the skeleton.
Use the wrench on the maintenance hatch at base of the
rail guard to get fuse.
Use one of the inverters to replace the fuse in the
hatch. This inverts the signal given to the rail guard: instead of lower; it
will raise the bar.
See that skeleton with mirror now focuses the light
inside the tunnel.
Bring mine bike to Goal:
Move the mine bike to other track:
Remember that the mine bike is on another track and there is no lever on the
shunting lever box.
Now that the light is directed to the tunnel; walk
right to enter the Outer Turn.
Pick up the lever at left and the empty
bottle at right of the tracks.
Continue on to be back at viaduct. Go left to the mine
car.
Use the lever on the shunting lever box. Push the
lever.
Set off to the left and be back by the crane. The mine
bike turns around automatically.
Place Goal on mine car:
Use crane to get Goal: Go to
the crane. Place the fuse taken from the maintenance hatch on the maintenance
box at left.
Use the crane lever. Oh my! Poor Goal! Rufus is very
tense and needs to relax.
Learn to meditate: Go back to
Doc at the viaduct via the tunnel.
Talk to Doc about more challenges. Then ask about
fidgety.
-
Lodge your feet behind your head.
-
Fixate on something on the horizon. Look-right click
at the horizon.
-
Tell the world who you are.
-
After that take a good swig from hip flask.
Get some booze: Use the empty
bottle on the booze and Doc stops Rufus.
Ask about meditating again. When Doc is in
meditative-yoga position, use the empty bottle on booze.
Then fixate on the horizon until the end of the
instruction.
Meditate in the crane: Go
back to the crane.
Follow Doc's instruction:
-
Click skeleton leg on seat. Rufus drops it at back of
seat.
-
Right click on horizon. See the colored letters.
-
Select PUPUP from the list.
-
Automatically, Rufus takes a drink from booze.
Now use the crane lever. Nice and easy.
Go to mine car and drive to tunnel.
Drive to Lower Ascension Station:
Control Center: Automatically
the mine car is moved to the other track. Set off to go around the track and be
back here facing the other way. The switch drops down.
Press the switch to bring the mine car up to top
level.
Map the route: Now that Goal adds
weight to the mine car; press the green button on the stand left of the mine
car.
See the circuit diagram.
Check the stand on the left. It has 3 levers on top
and 2 switches at bottom.
The levers set the direction of the mine bike's route.
The 2 switches change the P1 and the P2 on the
circuit diagram.
Change the settings and study the circuit diagram to
see if that is the route that will work.
Then do several trial runs to see which is the best
route to take. I found my route by trial and error.
Move the yellow lever down; red lever down and green
lever up.
Turn the left switch to green and the right switch to
red. Now we're really going places! Set off!

Organon soldiers are at the entrance to the rail
track. Hehehehe.
See Rufus go through the maze to Lower Ascension
Station.

Part 3 -
Lower Ascension Station
Candy Store:
Goal is asleep. Rufus wants to search a way to the
upper platform. Learn that this is where Rufus' father left him. Look around.
Anchovy machine: Check the
anchovy machine behind Goal. Use the machine to get an anchovies on a stick.
Look at anchovies on a stick in inventory to get Rufus
to eat it and get a stick.
Levers and lights: Play with
the levers and check the light bulbs. I did not find any function for them. LOL.
Red herring?
Cotton candy machine: Check the
big machine at center. Play with the lever it doesn't work.
Open the shelf left of the cotton candy machine. See
that the machine is unplugged. Plug the machine. No, it is not that easy.
The cotton candy machine starts.
See the kind of cotton candy made is by the picture on
top and color that is mixing in the machine.
Use the lever: white is neutral; orange is calzone and
green is phosphor flavored.
Use the stick on the cotton candy machine when it
is in green phosphor flavor to get phosphor cotton candy. If you get the
other flavor; just right click the cotton candy in inventory to get Rufus to eat
it and then get a stick again.
Chewing gum dispenser: Check
the chewing gum dispenser at left.
Eventually get a chewing gum with a dancing
cockroach with a hat and cane depicted.
Right click the chewing gum in inventory to get Rufus
to eat it and get chewed gum.
Lobby:
Exit to the left. Check the lit archway above Rufus.
Rufus lived at the candy shop for a week.
Mosaic: Go down to lower
level and check the Mosaic with hatch at left. It needs light.
Tower:
Exit to the left. Look around. Go right and down to
the pool.
Check the barrel of water and pool. It's bright green
water.
The other items are out of reach. Go back inside.
Concourse:
Go to upper left to be at concourse. Look around.
Left mosaic: See another dark
mosaic with hatch on the left.
Pick up the mosaic stone on the floor. It has a
message on it.
Right mosaic: Check another
dark mosaic with hatch on the right of the entryway. It is dirty.
Light up the mosaics: Use the
phosphor cotton candy on the lamp to get glowing phosphor cotton candy.
Open the hatch-niche of the left mosaic and use the
glowing phosphor cotton candy on the hatch. The stick fits and it lights up the
mosaic.
Look at the left mosaic table. It depicts the upper
class leaving the planet and the lower class are left behind.
Take the glowing phosphor cotton candy back.
Go left to the mosaic in the lobby. Use the
glowing phosphor cotton candy on the hatch-niche. It depicts the building of the
Ascension Station and the departure to Elysium.
Take the glowing phosphor cotton candy back.
Elevator:
Go back to the concourse and right to the elevator.
Check the clock and controls. Rufus tries to enter
RUFUS as password but the controls do not work.
Check the oil tank lid and the oil tank at right.
Right mosaic:
Clean the dirty mosaic:
Open the utility cabinet right of oil tank. Take mop, soap and bucket.
Go back to concourse, then lobby and out to tower.
Go right and then down to pool. Use bucket on pool to
get bucket with water.
Go back to the dirty mosaic at the concourse.
In inventory combine soap with bucket with water; then
use mop on soapy water to get mop with soapy water.
Use mop with soapy water on dirty mosaic. The
mop breaks and Rufus automatically picks up the mop handle.
Right mosaic: Use the glowing
phosphor cotton candy on the hatch-niche.
It depicts the cable boat leaving Deponia.
There are some missing mosaics. It must be the password
for the elevator because it is over the clock of the elevator.
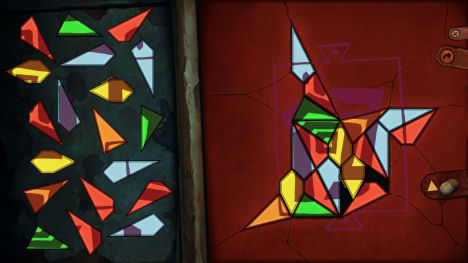
Mosaic puzzle: Use the mosaic
stone on the hole of the mosaic table. It does not stick.
Combine the chewed gum and mosaic stone in inventory.
Use the mosaic stone with chewing gum on hole.
See a close up of the puzzle. Place the mosaic stones
on the hole to complete the picture.
Left click picks up the mosaic stone and right click
turns it.
Use the lines in the background to orient the stones.
The colors are not logical.
When all the stones are placed (except the one with
gum); see that there are still some missing stones. The puzzle cannot be
completed.
Press the stone with gum on and Rufus presses the
mosaic enough times to break the mosaic again.
Pick up the mosaic stones but Rufus only picks up the
chewed gum.
Fuse box: Rufus' destructive
action exposes a fuse box behind the mosaic hatch.
Use the fuse box to get a torch light.
Use the fuse switch to reboot the elevator program.
Rufus changes the password to - guess what - RUFUS.
Platform:
Elevator: Now that the
controls are reprogrammed, go to elevator and use the controls. Rufus enters his password. Go up to platform.
Platform: See the arrival of
an Organon cruiser.
Check the lifeboat at left. Use the lifeboat and
realize it needs an Ascension code. That's the catch.
Look at the end of the cable and see Elysium in the
sky.
Use the lever to lower the flag. Take the flag.
Take the embellishment on the stairs railing.
Go left to exit to the elevator and then to the
concourse.
Organon:
Rufus eavesdrops on the conversation between Cletus
and Bailiff Argus.
Learn that they are in a joint venture. Cletus needs
the ascension code that is stored in Goal's brain implant. That is the only
reason Cletus is tolerating Goal. The Prime Controller is in on it too.
The Cletus guy looks just like Rufus.
Cletus: Go right and up to
the platform to follow Cletus.
Look at Cletus: greasy hair, ugly cape and stiff
collar.
Talk to Cletus. Learn that Deponia is going to be
blown up. Cletus was sent here as the inspector to check if the planet is
inhabited. Ulysses the Prime Controller also wants to blow up Deponia.
Cletus shows Goal's back up brain implant that has
memories stored but memory of Deponia is erased.
Rufus stresses that he hates Deponia. Rufus' rant
sounds like a repeat of what his father said.
Check the suitcase. Cletus didn't forget the bolt
cutter.
Darken the place: Go back
down and try to pass by Argus. Cletus says that he can't or the Organon will see
him.
In inventory, combine the embellishment from the
platform railing with the chewed gum to make deadly projectile weapon -
slingshot.
Pick pebbles from the floor at right. Combine
pebble with slingshot to get ammunition - slingshot with pebble.
Use slingshot with pebble on hanging lamp.
Argus is jumpy but is calmed by Ulysses. Try to pass Argus again - still Rufus refuses.
Impersonate Cletus:
Remember what Cletus looks like:
greasy hair, ugly cape and stiff collar.
Stiff collar: Check the
lampshade on the floor. Hmmm.
Use the mop handle with embellishment to get hook.
Use hook on lampshade.
Ugly cape: The flag from the
platform flagpole will do nicely.
In inventory, combine lampshade and flag to get
Organon getup.
Greasy hair: Go back to the
elevator.
Open the oil tank lid. Use mop on oil tank lid to get
greasy mop.
Add greasy mop to get improvised Cletus costume.
Bailiff Argus: Right click to use
the improvised Cletus costume while at the dark concourse.
Go left and Argus calls out. Rufus-Cletus talks to Argus.
Argus asks about the backup cartridge.
Go back to Cletus and talk about the backup cartridge.
When Cletus learned that Goal is unconscious, he relents and gives the backup cartridge. Cletus doesn't want to be stranded here in Deponia.
Go back to the concourse and go left of Argus. Again
Argus stops Rufus but was allowed by the intervention of the Prime Controller.
Go left and to the lobby. Rufus discards the costume.
Find Goal:
Follow the trail of Goal: Go back
to the candy store and Goal. Goal is gone.
Look around and see the place is in a mess. There is
phosphor on the floor.
Use the torch light on the puddle of phosphor. See the
trail to the exit. Exit the room.
At the entrance, use the torch light on the part of
phosphor trail on the floor.
Follow the trail to the mosaic. Use the torch light on
the part of phosphor trail on the floor.
Exit to the tower. Use the torch light on the phosphor
trail.
Enter the piece of fence and be behind the tower. Use
the torch light on the phosphor trail.
See that the trail goes into the grating.
Check the stack of needles full of syringes to get a
straw.
Use the hook on the grating.
Go through the cable chute. See trash heap piled in
front of the door at end.
Whale: See a whale that looks
hungry outside.
Go back to the candy store inside the building.
Use the anchovy machine to get anchovies on a stick.
Use anchovies on a stick on the puddle of phosphor to
get bait.
Go back to the whale outside the cable chute.
In inventory, use the torch light on the bait to get
glowing bait.
Use glowing bait on the hook above Rufus. The
whale tries to get the bait and pushes the trash heap away from the door.
Go through door.
Captain Bozo's trash heap:
Go forward and be in a wrecked cable boat beside a
trawler.
Go inside the cabin of the cable boat. See Goal, Bozo
and Doc.
Check Goal's implants: Doc
says he will check what is wrong with Goal's implants.
Click to eject the cartridge on Goal's temple. The
cartridge has to be handled with loving care.
Doc says there is just some dust on the pins; it
needs to be cleaned.
Change Goal's implants: Use
the backup cartridge on Goal and see what happens.
Goal doesn't remember anything. Rufus takes the backup
cartridge off Goal.
Talk to Doc and Cpt. Bozo. Bozo gets frustrated with
Rufus.
Get cleaning tools: Look around.
Take the duster under the ramp. Bozo uses it
for cleaning the tank.
Take the key on the floor beside the sofa.
Go outside and use the key on the chest. Get steel
brush and bottle of degreaser.
Clean cartridge: Right click
the cartridge in inventory to get a close up.
See that the reading head is clean; the chip is
clean but the contact pins are dusty.
The aim of the puzzle is to get the cartridge clean
and shiny after getting all parts dusty, greasy and corroded.
-
Use the duster on the contact pins. The contact
pins get greasy; chip and reading head are dusty.
-
Use duster on chip and reading head. The chip and
contact pins get dusty and greasy; the reading head is greasy.
-
Use degreaser on all 3: chip, reading head and contact
pins. The chip and contact pins get dusty and corroded; the reading head is
corroded.
-
Use feather duster on all 3: chip, reading head and
contact pins to get them dusty, greasy and corroded.
-
Use steel brush on all 3 and get them all clean (but
scratched). Rufus makes R - heart - G etching on the chip. Good as new.
Doc sees the scratches and notes the heart etching.
Rufus automatically places the cartridge on Goal.
Goal wakes up and remembers. She knows that Deponia is
inhabited.
Talk to Goal to explain the er... situation.
Perfect plan:
After discussing the plan; go back to the station.
Go outside, down to the cable chute, behind the tower
and front of tower.
See Argus and the soldiers. Argus says that the
Elysian must not be eliminated but the Deponian can be.
Get to crane: Look at the crane
lever and see that the soldiers are under the magnet.
Check the layout of the path to the crane.
-
Go to the pool and use the straw taken from the stack
of needles on the pool.
-
Go left to the open trunk. Rufus comes out of the
right window.
-
Go to the left window. Turn the crank to open the
French door.
-
Go to the French door. Take the fork.
-
Go to the pipe at foreground. See Rufus' hand sticking
out. Place the fork on the horn.
-
Use the horn. It removes the lever of the hood and
closes it but pulls open the canopy top.
-
Go to the canopy top and be above the wreck.
-
Walk over the board and the platypus. The platypus
soft toy makes a sound.
The light of the soldiers focuses on the exit.
-
Take the platypus while standing on the left.
-
Walk over the board to right side.
-
Place the platypus back on the board.
-
Cross to other side and make a noise with the platypus.
This will get the soldiers to focus the light beam away from the exit while
being close to the exit. Then
automatically exit to the crane.
-
Go to the crane. Use the crane lever to take care of
the soldiers.
Take care of Cletus:
Goal and Rufus enter the station and the concourse.
Goal goes ahead to the platform while the Bailiff has
a private talk with Rufus-Cletus. Bailiff reiterated that Goal's memory must be
erased and to get the Ascension code.
Rufus-Cletus says that he will leave the cartridge on
the platform.
Go to the elevator and then platform.
Talk to Cletus. Let them sort it out by themselves.
Open the bag and get a second costume-Cletus' rags.
Use the costume by right clicking it in inventory.
Rufus leaves his outfit on the platform.
While wearing the disguise, talk to Cletus completely.
Mimic (Don't make me laugh) Cletus until he shows his
birth mark by pulling down his pink underwear.
Pull Cletus' speedos. Use the flagpole and Cletus
hangs from the flagpole.
On to Elysium:
Goal realizes the selfish reason Rufus wants to go to
Elysium.
Take Goal's cartridge. Rufus leaves it on the
platform.
Argus comes up and sees the situation. Argus explains
why Rufus is the better person to be in Elysium because he will not jeopardize
his selfish desire to be at Elysium.
See Rufus and Goal with back up memory ascending to Elysium. Use the
middle dialogue (Say Goal...) until Rufus comes clean to Goal.
Back at the platform, Goal demands her old memory
cartridge back. Rufus takes the backup memory cartridge.
Get the original cartridge back:
Go down the elevator and to the concourse.
See Argus demands the faster use of the ascension code
from the soldiers. The relay short-circuited.
Prime Controller wants to address the soldiers at
Porta Fisco. The Organon leaves.
Take the memory cartridge with the ascension
code from the reading
machine.
Cletus:
Go to the elevator at right and be met by Cletus. He wants the cartridge and he
will erase Goal's short term memory.
Talk to Cletus. Argus arrives. Select the last dialogue - give the
cartridge.
Goal: See Goal wakes up.
After some er... discussion; Goal and Cletus row back to Elysium.
Escape: Rufus watches the
ascension of Goal and Cletus. Argus decides not to let Rufus go because he knows too much.
Watch what happens.
Turn to the right - ramp and use the handle of the
Prime Controller's flier.
Rufus is with Captain Bozo.
Is Deponia safe?
It's out of my hands now.
This document may not be distributed without express written permission of the author and the content may not be altered in any way.
For Questions or Comments on this Walkthrough,
Please write to: MaGtRo
Copyright © 07/2012 MaGtRo
 GameBoomers Walkthroughs and Solutions


