| |||||||||||||||||||||
| |||||||||||||||||||||
| The guard outside the temple (on the left) won't allow you to enter and you cannot use the cobra of hypnosis on him without knowing his name. | |||||||||||||||||||||
| Go to the pool area and talk to the worker, who isn't exactly helpful. Take note of the ostracon in the basket in front of him. He won't let you take it, so you must find a way to distract him. Pick up some pebbles lying on the ground (at either 1 or 2 on the map) and toss them into the pool while standing in front of the worker. When he turns around, quickly grab the ostracon from the basket. Examine it in the inventory to see that it contains caricatures drawn by the worker. Again talk to the worker and he agrees to trade the ostracon for the guard's name. | |||||||||||||||||||||
| Now use the cobra of hypnosis on the guard at the temple entrance, after which any item from your inventory can be used as a pass to enter the temple. | |||||||||||||||||||||
| Speak to Khâemouaset and show him the dolerite papyrus. Listen carefully to what he says as you get an important clue to solving a puzzle later in the game. He also says that a harmful presence is soiling the temple and that, as a clairvoyant, you might be able to get rid of it. | |||||||||||||||||||||
| Use the Widget-eye of clairvoyance on the wall cabinet to the right of Khâemouaset to learn there's something there. Open the cabinet, noting that part of the wall inside is broken. Use the Widget-eye of clairvoyance on the inside wall to trigger a cut scene in which Maya sees a dried scorpion behind the wall. Remove the broken section of the wall with the knife and take the dried scorpion. | |||||||||||||||||||||
| Khâemouaset gives you a banner for controlling the wind and says you must prove yourself worthy by opening Ptah's magic coffer on the floor below the wall cabinet. Take the key lying on the altar in the centre of the room and use it open the coffer. | |||||||||||||||||||||
| |||||||||||||||||||||
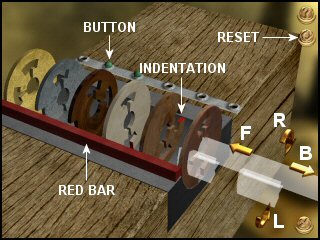
| You need to manipulate the lock so that the indentations on all six discs are aligned with the red bar on the left of the mechanism. This is done by moving and rotating the lock-pin either forward, back, right or left. Depending on the position of the lock-pin, all four movements are not always available. When a disc is correctly aligned with the red bar a green button on the right pops out. The best way to solve this puzzle is to begin with the farthest (gold) disc, then the disc to the right of it and so on. | |||||||||||||||||||||
SOLUTION | |||||||||||||||||||||
| |||||||||||||||||||||
Alternatively, there's a cheat to bypass the puzzle - press the following keys simultaneously: | |||||||||||||||||||||
| |||||||||||||||||||||
| Remove the kyphi (perfume) from the coffer and give it to Khâemouaset. Unfortunately the perfume still requires some fragrant rush before he can perform the ceremony. | |||||||||||||||||||||
| Return to the worker who is prepared to give you some fragrant rush in return for the gouge that he threw onto a lily pad in the pool. Pick up the string lying at the base of the rectangular structure, at 3 on the map. Examine the falcon sitting on the wall (at position 4 on the map) to see that it's holding a shiny object. Get some more pebbles (at either 1 or 2 on the map) and toss them at the falcon. It flies off and drops a piece of copper. When you take the piece of copper it automatically attaches to the string (if you already have the string in your inventory) making a grappling hook. Now go back to the worker, and while facing him, pan to your left to see something shining on one of the lily pads in the pool. Use the grappling hook to pull the lily pad closer and take the gouge. Give the gouge to the worker and get some fragrant rush in return. In appreciation, he gives you some water lily seeds. | |||||||||||||||||||||
| Go back to the temple and give the fragrant rush to Khâemouaset, who performs a ceremony that transports Maya into the World of Ptah... | |||||||||||||||||||||