| ||||||||||||||
| ||||||||||||||
| At this point in the game you won't find Khâemouaset in the temple, so there's no need to go there. | ||||||||||||||
| Go to the pool area and talk to the little girl in front of the rectangular structure. She tells you to bring her the recipient of Isis, which can be found by restoring the coping of the nilometer. | ||||||||||||||
| The coping of the nilometer (at 1 on the map) has a half rubbed out bas relief drawing on it. Place a blank sheet of papyrus over the drawing and use the charred stick to make a tracing. Do you recall the ostracon in the worker's basket? From the caricatures he drew on it, you know the worker is an artist. Give the tracing of the design to be completed to the worker, who agrees to finish it if you find an egg to use as a binder for his ink. The bird's nest on the wall (at 4 on the map) has got eggs in it. Put the plate (found at 2 on the map) on the ground below the nest and use the stick (found at 3 on the map) to push out an egg from the nest. Pick up the smashed egg (in the plate) and take it to the worker. You also need to give him the inked calamus, after which he completes the drawing. | ||||||||||||||
| Return to the nilometer and put the finished drawing on the coping. Click the 'star' on the drawing to get the sacred recipient, then take it to the little girl. | ||||||||||||||
WORLD OF ISIS | ||||||||||||||
| Queen Isis says you must traverse the Book of the Dead to join Osiris in the Great Beyond. To get there you have to cross the islands of this world. She also gives you a magic net. | ||||||||||||||
FIRST PASSAGE | ||||||||||||||
| Walk over to the far end of the island to find the first passage. After trying to cross the water, talk to Queen Isis again and she tells you that the god Nefertem can help you. If you examine the water lily seeds (in your inventory) with the magnifying glass you learn that the water lily plant is dedicated to the god Nefertum. Throw the water lily seeds into the water, then cross over to the other bank. | ||||||||||||||
SECOND PASSAGE | ||||||||||||||
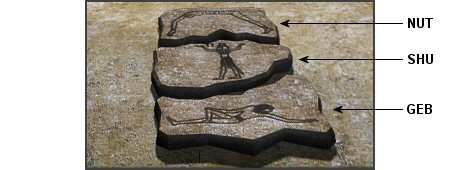
| To cross the second passage all three stone tablets on the altar must be moved across to the altar on the next bank. You can only carry one at a time and can't leave Nut alone with either Shu or Geb. | ||||||||||||||
| ||||||||||||||
SOLUTION | ||||||||||||||
| ||||||||||||||
THIRD PASSAGE | ||||||||||||||
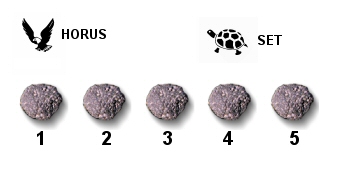
| Queen Isis says that by successfully reconciling Horus and Set in front of the middle island you can pass over the tortoise's back to cross the channel. Initially Horus (represented by a hawk) is in front of the first island on the left and Set (represented by a turtle) is in front of the fourth island. | ||||||||||||||
| ||||||||||||||
| Horus (the hawk) moves when you step onto the island in front of him. His pattern of movements is from Island 1 to Islands 3, 5, 2 and 4. To move Set (the turtle) you need to 'click' him from whatever island he is in front of. His pattern of movements is from Island 4 to Islands 2, 5, 3 and 1. | ||||||||||||||
You get both Horus and Set in front of the middle island (Island 3) as follows: | ||||||||||||||
| ||||||||||||||
IRRIGATION SYSTEM | ||||||||||||||
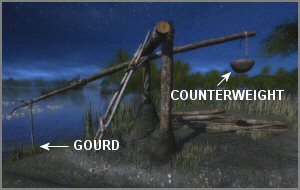
| In order to raise the gourd out the water you need a heavier counterweight. Did you find some rocks on the island before crossing the third passage? If not, walk right twice from the shaduf to find a pile of rocks lying on the ground. Put the rocks inside the counterweight on the right of the shaduf, then pull the gourd out of the water to fill the canal. | ||||||||||||||
| ||||||||||||||
| Maya walks through the water arch to get to the Book of the Dead. | ||||||||||||||