| ||||||||
Your adventure begins with Maya arriving at the Temple of Amun-Re... | ||||||||
| ||||||||
| Talk to Djer, the construction supervisor, who wants proof that you were sent by Pharaoh. After you show him the seal of Pharaoh he tells you Paser is in the only priest's house with a decorated lintel. | ||||||||
| Paser's house has hieroglyphics on the lintel and a vase outside. He talks about the accidents and his illness. In the third room you find a torch on the table. Also examine the statuette on the table to learn that it can slide. | ||||||||
| Return to the Temple and pick up the piece of a cartouche in the room with two coloured pillars. Go back to Djer and he gives you the second piece of the cartouche. Give both pieces of the cartouche to the worker in the courtyard, who glues them together. Note that you need to show the worker the seal of Pharaoh before he'll talk to you. | ||||||||
| At the far end of the Temple you see that there's a cartouche missing from the wall to the left of the naos. Insert the mysterious cartouche (glued together by the worker) to open a secret passageway in the left wall. Light the torch (found in Paser's house) on the flame in front of the naos and then go through the passageway to an underground crypt. | ||||||||
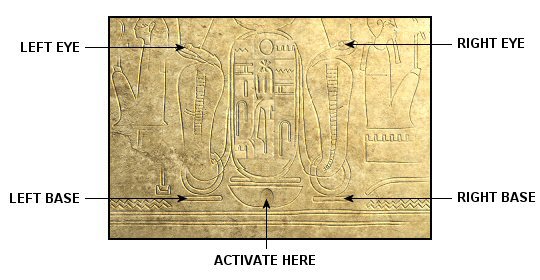
| Examine the hieroglyphics on the wall next to the locked door carefully, noting the 'sparkles' around the circle inside the base in the centre. Insert the seal of Pharaoh in the circle to activate the locking mechanism. You should now see 'sparkles' around the eyes and bases of the two cobras. | ||||||||
| ||||||||
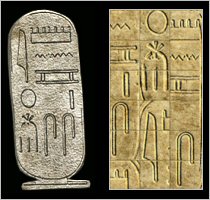
| Check the Documentary Database, which should be opened on The Cartouche of Ramses II page. Look carefully to see that the symbols on the cartouche in the centre of the locking mechanism are the same as those on right cartouche in the Documentary Database, except in different positions. | ||||||||
| ||||||||
The symbols on the locking mechanism cartouche are arranged within a 3 X 6 grid and they can be shifted around by clicking the eyes and bases of the two cobras as follows: | ||||||||
| ||||||||
To arrange the symbols on the locking mechanism correctly, click the controls as follows: | ||||||||
| ||||||||
| Before leaving the crypt, pick up the Cartouche of Amun-Re from the floor against the wall opposite the entrance. Also lift the loose tile on the floor against the left wall to reveal the foundation deposits. When you take the foundation deposits Maya has a vision of the obelisk being broken and the death of Pharaoh. | ||||||||
| Return upstairs and go to Paser. When you show him the foundation deposits he tells you that one of the amulets is cursed. He also gives you the purification jar to remove the mysterious cartouche that you inserted in wall next to the naos. | ||||||||
| Return to the naos and use the purification jar on the mysterious cartouche to destroy it, then insert the Cartouche of Amun-Re (found in the crypt) in it's place. | ||||||||
| Go to Paser, who gives you a black stone to help find documents that are hidden behind the statue of Imhotep. He tells you to take the documents to his assistant, Ouni, at the Aswan quarry. Did you see the statuette on the table in the third room of the house? Use the black stone on the statuette to slide it to the right, revealing the quarry documents. | ||||||||
| You're now ready to ask the guide (waiting for you in the courtyard) to take you to Aswan... | ||||||||