| |||||||||||||||||||||||||||
| The large first hall is divided into four areas (front, rear, left and right) separated from each other by a lava river. Each of the areas has a tunnel exit leading to the central Hall of Sakhmet. Although the Hall of Sakhmet has four tunnel exits, they all lead to the same area. The four alcoves (marked 1, 2, 3 and 4 on the map) become relevant later in the game. | |||||||||||||||||||||||||||
| |||||||||||||||||||||||||||
| You arrive in the front area of the first hall. Pick up the pincers lying on the ground and note the anvil (large rock) near the lava river. Go through the tunnel to enter the Hall of Sakhmet. If you go through any of the four tunnels from here you end up back in the front area. | |||||||||||||||||||||||||||
FINDING PTAH | |||||||||||||||||||||||||||
| After using the pincers to loosen the head of Thoth on the canopic jar at the base of the large statue of Sakhmet, turn the head once so that it faces to the right. The four tunnel exits will now all lead to the right area of the first hall. Go there and talk to the dwarf metalworker, who says that you need to make a sistrum in order to invoke Ptah. | |||||||||||||||||||||||||||
| Return to the Hall of Sakhmet where you learn that access to each of the four areas of the first hall is determined by the direction in which the head of Thoth is facing. | |||||||||||||||||||||||||||
| You find the bronze strip and a handle in the rear area, and a mallet in the left area. | |||||||||||||||||||||||||||
| Go to the anvil in the front area of the first hall. Heat the bronze strip in the lava river to the left of the rock and place it on the anvil. Use the mallet to fashion the bronze strip and then attach the handle. You now have a mute sistrum that needs metal rods to make it musical. | |||||||||||||||||||||||||||
| Go back to the dwarf metalworker and ask him about the rods. He tells you that the rope (above his head) is broken. Did you see the rope hanging down from an alcove in the left area? Go to this area and use the knife to cut off a length of rope that can be tied to the rope above the dwarf. After doing this, again talk to the dwarf who gives you the rods and tells you to play the sistrum near the anvil. | |||||||||||||||||||||||||||
| Walk towards the anvil (in the front area) to trigger the appearance of Ptah. Again you have to prove yourself worthy by bringing a ball of magical dolerite to Ptah. He tells you to open a passage (in the Hall of Sakhmet) leading to another almost identical room and that after opening the passage three times you reach a room containing the dolerite tools. In there is a dolerite ball (initially light, airy and elusive) that becomes hard as lava when above the circle to which it corresponds. He also informs you that a metalworker has the die for the key to the first passage. | |||||||||||||||||||||||||||
| Go to the right area and get an empty mould from the dwarf metalworker, then fill it with molten lava from the river next to the anvil. Place the filled mould on the anvil to cool down. Wait for it to change colour (from bright orange to grey) before picking it up again. | |||||||||||||||||||||||||||
| Examine the key of life held in the right hand of the statue in the Hall of Sakhmet to see that a piece of it is missing. After attaching the lava object to the key of life, you find a gold sceptre in the alcove marked 3 on the map above. Click the sceptre to trigger a mechanism that opens the first passage Ptah spoke about. When you now exit through any of the tunnels you enter another similar room. | |||||||||||||||||||||||||||
CLAY SPHERES | |||||||||||||||||||||||||||
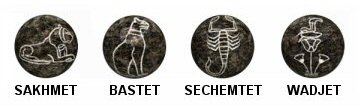
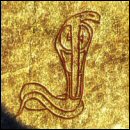
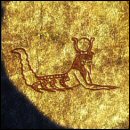
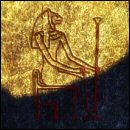
| Use the Widget-eye of clairvoyance on the base of the statue to see four clay spheres. To open the base, put the damaged dolerite ball on the collapsible stone slab in front of the statue. Examine the spheres (in your inventory) with the magnifying glass, noting the symbol depicted on each one. | |||||||||||||||||||||||||||
| |||||||||||||||||||||||||||
| Each of the four alcoves in the room (marked 1, 2, 3 and 4 on the map) has a symbol carved in the rock. You need to insert each clay sphere into the corresponding alcove. Although the symbols are different you should be able to match three of the creatures - cobra, scorpion and the cat in a sitting position. Perforce you then know where the fourth sphere must go. | |||||||||||||||||||||||||||
SOLUTION | |||||||||||||||||||||||||||
(hover your mouse over the ALCOVE NUMBER wording to reveal the corresponding sphere) | |||||||||||||||||||||||||||
| After placing the correct spheres in the alcoves the second passage is opened. Exit through any of the tunnels to enter yet another similar room. | |||||||||||||||||||||||||||
LOTUS FLOWER SOUNDS | |||||||||||||||||||||||||||
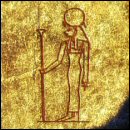
| Talk to the statue (Sakhmet, the lioness) who agrees to tell you about the path that leads to the ball of magical dolerite if you answer her question. If you listened carefully to what Khâemouaset said in Memphis, or if you've got a good knowledge of Egyptian mythology, then you'll know the answer: | |||||||||||||||||||||||||||
| |||||||||||||||||||||||||||
| Click the lotus flower in Sakhmet's left hand to hear three distinctive sounds. Also take note that the sounds are repeated at varying intervals: | |||||||||||||||||||||||||||
| |||||||||||||||||||||||||||
| |||||||||||||||||||||||||||
| The dish at the foot of the statue is for offerings and ablutions. As ablutions are religious purification rituals, use the purification vase (spell) on the dish, then take the bowl of lava. | |||||||||||||||||||||||||||
| The alcoves in the room have water dripping in them. Experiment by putting various inventory items in the alcoves marked 1, 2 and 4 on the map above (alcove 3 is not used) and listen carefully to the sounds made, as well as the intervals at which the sounds are repeated. | |||||||||||||||||||||||||||
The sounds made by Sakhmet's lotus flower are produced by the following inventory items: | |||||||||||||||||||||||||||
| |||||||||||||||||||||||||||
The repeat intervals of the sounds in the three alcoves are as follows: | |||||||||||||||||||||||||||
| |||||||||||||||||||||||||||
SOLUTION | |||||||||||||||||||||||||||
| |||||||||||||||||||||||||||
HALL OF DOLERITE TOOLS | |||||||||||||||||||||||||||
| |||||||||||||||||||||||||||
| The south and east rock pillars both have a square symbol emblazoned on them, the west one has a circle and the north one a triangle. The symbols are identical to the three dolerite objects (square, ball and triangle) on the slab in the centre. | |||||||||||||||||||||||||||
| The dolerite objects can be moved around (on the slab itself or to and from the pillars) by using the banner for controlling the wind. In order to take the magical dolerite ball it must be moved above the west pillar, i.e. the one with a circle (ball) emblazoned on it. | |||||||||||||||||||||||||||
SOLUTION | |||||||||||||||||||||||||||
| |||||||||||||||||||||||||||
RETURN TO EGYPT | |||||||||||||||||||||||||||
| Exit through the tunnel (behind the south pillar) to return to the front area in the first hall. Again walk towards the anvil to speak to Ptah. He says that by returning the dolerite ball to where it came from you can get back to Egypt, and he also gives you the bee of the magical wax. | |||||||||||||||||||||||||||
| Drop the magical ball of dolerite into the lava river (left of the anvil) to return to Memphis. From there go to the guide and ask him to take you back to Aswan. | |||||||||||||||||||||||||||