Shadows on the Vatican
by 10th Art Studio & Adventure Productions
Walkthrough by MaGtRo
Gameplay: This is a third person point and
click game.
Before the game starts, see the game settings: display and sound
selection frame. The display frame has device, colors and run in window choices.
The sound has a choice of sound device.
The main menu has comic strips at right that opens, new game, load, save,
options and quit selections.
The options menu has shadows and dialog (subtitles)
selections. The right side has volumes for main, music, FX and voices
adjustments. Click on the save and exit comic strip at top or the back strip at
bottom when selections are completed.
The tutorial on how to play the game can be selected
at start of the game.
The main menu is accessed by the ESC key.
Dialogue can be skipped by left clicking.
The space bar shows all hotspots.
The M (case sensitive - must be capitalized) key shows the map.
The inventory is at top of the screen.
In Win7, the saved games folder is in
C:\Users\computer name\Saved Games\Shadows on the Vatican folder.
ACT 1: GREED
February 2012
Africa 1996:
Dellerio watches over children greeting the arrival of a helicopter in an African village. James is in the helicopter. Armed men in vehicles arrive and kill Dellerio. James mourns his mentor, His Eminence Dellerio.
Meet James Murphy.
James is an ex-priest and is now a medical doctor from Chicago.
Rome 2010:
Select to do the tutorial or not.
Flat:
The phone rings.
Pick up the cell phone on the counter right of the stove.
Cristoforo:
James talks to Cristoforo, his friend from his former priesthood in Rome.
Cristoforo wants to meet at the bar downstairs to talk about the
mysterious call for help he sent to James.
Mario:
Mario the owner of the bar arrives. Talk to him completely.
Learn that this is
his brother in law's apartment. He loans James his brother in law's car. Mario
gives him the car keys.
James notes that
Mario has a wound on his arm from repairing the car.
Treat Mario's
wound: Go to the bathroom at right. Look around.
Take the first
aid kit from the open cabinet above the sink at left. Check-right click
the first aid kit in inventory to get: cotton, peroxide,
scalpel and gauze.
In inventory at
top of the screen has bible and wallet already.
Go to the shelves
left of the shower and take the sewing kit (needle and thread)
and silicone tube.
Exit the bathroom.
Sterilize the
needle by turning on the stove and using it on the stove. James automatically
turns off the stove.
Combine the
needle and thread in inventory.
Use the cotton
with the peroxide bottle. Use the soaked cotton on Mario.
Use the needle and
thread on Mario. Apply the gauze on Mario.
Bar:
Mario shows James
his bar. Mario gives James a good bottle of Grappa. Look around.
Exit the bar to
wait for Cristoforo. Get a call from Cristoforo. He wants to meet James at
Santa Brigida's House at Piazza Farnese instead. He sounds terrified.
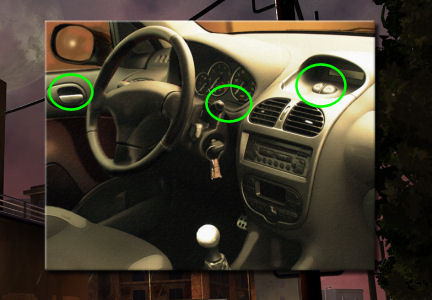
Press the space
bar and see that the red car is James' car. Use the car keys
on James' red car.
Map:
See the map of Rome. You can jump to any location shown by the pictures. The
map can be accessed using the upper case M key.
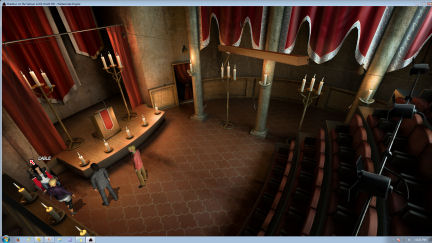
Piazza Farnese:
Hear a scream. A
nun finds a bleeding Cristoforo. Cristoforo is taken by the paramedics. He
says to James "you were right".
Guest house:
Look at Cristoforo's things on the floor. See psalm book, strap, notepad, book
and blood on the floor.
Check the book or
notepad and the nun stops you. After the nun's fear of being accused, take the
notepad.
Right click to
read the notepad in inventory. Click on the 3 7 9 5 written on it.
Right click the book and
see that it is In God's Name, a David Yallop's Essay. Take the book.
Left and right
click the blood and stairs.
Left and right
click the psalms book and the strap. James concludes that Cristoforo was
pushed down the stairs.
Exit at right
hallway to go to the hospital.
Hospital:
James looks at
Cristoforo. On the way out,
James passes Cardinal Brehmen.
Learn about Cardinal Brehmen, the direct
superior of Cristoforo.
Piazza Farnese:
Go back to the
Guest House at Piazza Farnese. Enter Santa Brigida House left of the Church.
Nun:
Talk to the nun by clicking on the pictures below.
The nun is alone
at the Guest house. Sister Candida BigMouth usually helps at lunch. Cristoforo
has been here for 5-6 days and stayed in the library the whole time.
Keys:
Left and right click the window of the key cabinet. Learn which one is
Cristoforo's room and see his bunch of keys. Aside for the room key, the other
keys were added by Cristoforo.
Ask the nun for
the keys and she refuses.
Learn what
Cristoforo is researching:
Book:
Right click the book in inventory - In God's Name, a David Yallop's Essay. The
book discusses the death of Pope Giovanni 1, Vatican Bank, the relationship of
the Holy See and Free Mason.
Take the
bookmark-Holy Picture of St. Alessio Falconieri and automatically the other holy pictures
used as book markers. Then read the close-up of the open book; turn the
page.
Learn about the US
Justice Dept. investigation of evidence, counterfeit bonds and deposits to the
Vatican Bank.
Another page is
about a secret meeting that led to Uncle Giacomo Lercaro's support of Cardinal
Montini being elected pope. Learn about the influence of Umberto Ortolani in
the Vatican.
Learn of the sale
of the Veneto branch of the Vatican Bank by Paul Marcinkus to Roberto Calvi of
Milan.
Learn how Albino
Luciani entered the seminary and what influenced his life.
Read about
Luciani's activities when he became pope; his investigation into the corrupt
and dishonest practices in the Vatican.
Calendar:
Right click the calendar right of the exit and behind the nun that shows that each day is a celebration of a saint.
Click the
bookmarks taken from the book on the calendar behind the nun.
Right click the
bookmarks in inventory to learn the days of celebrations:
St. Alexis
Falconieri - Feb 17.
St. James the
Apostle - May 3
St. Joseph - March
19
St. John of
Nepomuk- Jan 5
St. Stanislaus of
Szczepanow - April 11.
Decode the
bookmark clues:
Combine the
bookmarks and the book in inventory to automatically place the bookmarks in
place.
Open the book
again with the bookmarks in place.
Using the day as
the line number and the month number as the position of the word in that line,
decode the clue.
Click each word so
that James will circle it.
St. Alexis
Falconieri's day is Feb 17 (2-17). The second word on line 17th is
cooperative.
St. James the
Apostle - May 3 (5-3). The fifth word of the third line is Ostia.
St. Joseph - March
19 (3-19). The third word on the 19th line is bank.
St. John of
Nepomuk- Jan 5 (1-5). The first word on 5th line is credit.
St. Stanislaus of
Szczepanow - April 11 (4-11). The 4th word on the 11th line is of.
James combines it
to form Cooperative Credit Bank of Ostia.
Exit the guest
house.
Cooperative
Credit Bank of Ostia:
Go to the Bank of
Ostia. Left and right click active characters and the book on the coffee table.
Anna:
Talk to the elderly woman sitting down. LOL. Mom tells Paola to hurry up.
Continue to talk to Anna Marano. Learn about her husband, the former employee
at the bank.
Paola:
Exit the conversation and then talk to Paola.
The bank has no
other branch except for this one. The staffs are usually the children of former
staff. Learn about Paola's father displeasure that Paola is working at the
bank.
The bank receives
funds for charity from the IOR-Vatican Bank.
James comments
that Cristoforo was following this clue.
Anna:
Talk to Anna Marano-mom again. Anna says that a man- Cristoforo talked to her
at her home and asked her the same questions that James asked Paola.
Learn that
Cristoforo got a book that has some pages with notes written by her husband in
exchange for the Book of Prayers that is on the coffee table.
Cristoforo states
that that book of prayers was given to him by a priest friend named James.
Anna wants proof
that James is the same friend before she would allow James to check the book.
Show Anna the
bible in inventory.
Book of
Prayers: Pick up the book on the coffee table.
Right click the
book in inventory. Read and click on
the inscription: When you will roam in the darkness, look at the Cross and
the light will extend its longer arm to show the way. James wrote down
the inscription on the notepad.
Check the lump
under the inscription. Use the scalpel to cut the lump and get a small
medal.
The medal shows
Pope Leone I. James wrote down on the notepad the Latin Inscription on the back of the medal.
Return the book to
Anna. In return, James must have a date with Paola. LOL.
Exit the bank and
go back to James' house.
Investigate the
medal clue:
Enter the flat.
Check the notepad
and turn the pages to see James' notes. Click on the notes to hear James talk
about them.
The Latin
inscription is translated as The Church of St Leone of Leprignano.
Do a search
about the Church of St. Leone:
Use the laptop on
the table. Click on the web search engine.
Click on the Latin
inscription to automatically type in Leprignano. Click "search".
Learn about Pope
Leone the Great and the new name of the village - Capena.
The attractions are
an ancient abbey, tower and the church. Close the pages and then click the red
button at bottom left of the laptop screen.
Church of St.
Leone in Capena:
Click shift M to
access the map. Go to Capena.
James
automatically talks to the church keeper inside the church. Talk to him
completely and learn Cristoforo was here several days ago. He was interested
on the lower level-inner area.
Check the drape in
the inner area. Use the medal on the drape and see that they are both St.
Leone.
Check the window
in that area. It is different.
Try to take the
drape and the church keeper stops James. Give him a donation by clicking the
wallet on him. He gives a postcard and leaves James alone in the church.
Drape:
Take the drape. Examine it in inventory. See a hole on the medallion
the pope is wearing and he is carrying a cross.
Use the drape on
the window but James can't reach it.
Use the drape on
the candle snuffer at outer area to get drape and candlesnuffer.
Use the drape on
the candle snuffer on the window.
Position the
drape on the window:
Right click to
rotate the drape.
Remember the
inscription on the book of prayers. When you will roam in the
darkness, look at the Cross and the light will extend its longer arm to show
the way.
Position the
longest arm of the cross on the horizontal bar of the window.
The light beam
focuses on a niche on the base of the archway.
Check the niche:
There is a hexagonal opening on it. James needs a key.
Exit the church
and James automatically place back the drape.

Get
Cristoforo's keys:
Go back to Piazza
Farnese and the guest house.
See the nun take a
swig from a bottle and hides it behind the plant.
Click on the bunch
of keys in the cabinet.
Check the bottle
behind the plant. It is empty.
Give the nun the
bottle of Grappa. After some trade of secrets, pick up the bunch of
keys from cabinet.
Right click it and
see that there is a hexagonal key in the bunch.
Open the niche:
Go back to the church in Capena.
Use the hexagonal
key on the niche. James takes a diary and a cell phone.
Diary:
Examine the diary. It is the banker Marano's diary. Read the diary.
Learn of the
directed funds and DreamRes. James notes it down. Robert Evola is the owner of
DreamRes.
Cell phone:
Check the cell phone. James says that it has a file that can be opened only by
a computer and needs a PIN code.
Check the cell
phone & DreamRes:
Cell phone:
Go back to James' flat.
Use Cristoforo's cell phone on the laptop. It wants the PIN code.
Enter using your
computer's keyboard, the number that is written on his notepad - 3795. Press
"enter".
Open the movie
file. See a man offered 50000 to get the papers and then threatened
Cristoforo. There is another man in the background.
James took a copy
of the frame-photo of the meeting that has both men.
Dream Res:
Use the laptop again and do a web search for DreamRes.
DreamRes is a real
estate company especially in Sardinia and Antigua Island. See a picture of
Evola, the owner of the real estate company.
Find the criminal:
Study the film
clip. Note that the baddie is standing by P(arking)) sign.
The other man
behind him is gray haired and smoking a cigar.
Let's check roads
that we have been. Go outside the flat. No P sign.
Piazza Farnese:
Jump to Piazza Farnese.
See the P sign in
front of the Amato Gioielli-jewelry store sign left of the guest house.
Use the photo of
the meeting on the jewelry store. James says this is where the meeting
occurred.
Jewelry store:
Use the intercom. A man comes out.
The man is gray
haired and holding a cigar.
While talking to
him; click the photo of the meeting in inventory.
Then click the
witness-blurred smoking man in the picture.
Then click the
criminal in the picture. The witness did recognize the criminal but denies
it.
Confirm the
witness: The man throws the cigar on the ground and goes
back in the store.
Pick up the
cigar.
Combine the cigar
with the photo of the meeting. James is convinced that the jeweler is the
witness.
Use the intercom
again. Talk to jeweler
again. Click on the cigar in inventory.
The jeweler is
convinced and says that the criminal is Maurizio Tarzo aka Massimino. He owns
a nightclub at the rough part of town called Raja.
Follow Massimino:
Jump to Raja
nightclub. See that Massimino leaves with his bodyguard.
Follow the car by
clicking on the arrows.
Click arrow that
points to: right - right - left - right - up - left - right
- down - down - down - right.
Massimino meets
with a man about an item.
Get car
identification:
The bodyguard
stands outside beside the luxury car of the man met by Massimino.
See a drunken
person walk the street and the bodyguard looks down the street.
Divert the
attention of the bodyguard:
Place Cristoforo's
cell phone on the bush right of James' red car.
James hides behind
the gray car.
When the bodyguard
faces forward, move behind the trash can beside the luxury car and bodyguard.
Use James' cell
phone. James automatically rings Cristoforo's phone in the bushes. The bodyguard checks that
side of the street.
Click on the
luxury car to get James find clues to the owner's identity. Then click on the
license plate. It is dirty.
Use the soaked
cotton on the license plate. James enters the number in the notepad. One
character is still unreadable. James enters the info in the notepad.
Automatically be
on the map.
Find the owner of
the luxury car:
Get help from
Mario: Go back to James' house. Enter Mario's Bar.
Talk to Mario.
James tells him about Cristoforo and asks him for help in tracing the license
plate.
Mario calls a
relative named Anita that works at the police dept. Anita does not have the
time to check the license plate since it is missing one character but she
gives access to the Motor Vehicle site with her log in and password. James
enters the info in the notepad.
Find the
vehicle registration: Go to James' flat. Use the laptop.
Click on Motor
Vehicle Department icon. Type in using your computer the user and password on
the notepad to enter it on the login data frames. Click "enter".
Type in the
incomplete license plate info as stated on the notepad - VK-3C*G2. Click "enter".
Check the 2 luxury
cars registered in Rome. See that VK3C7G2 is owned by Evola.
Roberto Evola is the owner of DreamRes. Get his address also. Aha! Close the
page.
Click on the red
power button at bottom left.
Get inside
Roberto Evola's mansion:
Go to Evola's
mansion -Villa Marina.
Look around. Check
the electronically closed gate.
Click on the
camera at left end of the fence.
Left and right
click the damaged fence. James can't reach it but he can use it to gain
entrance to the mansion.
Click the garbage
bin. Now that the damaged fence is a plausible entry point, James pushes the
garbage bin under the damaged fence.
Try to climb to
the damaged fence but the camera will see James. Use the scalpel on the
camera. James cuts the camera.
Click on the
damaged fence to climb over the fence.
Stop Evola from
burning documents:
Evola is burning papers in the fireplace.
Look around and
see the chimney of the fireplace Evola is using to burn the documents.
Use the scalpel on
the sheet covering the car to get a sheet.
Climb the
scaffolding. James didn't make it up and needs leverage.
Use Cristoforo's
keys on the scaffolding. James climbs up to the roof terrace.
Seal the patio door with
the silicon tube. Use the sheet on the chimney. Watch what happens.
James gets
Cristoforo's briefcase. Learn about the money diverted by the Ostia Bank to
Evola; without any given to charity. Massimino uses the IOR account to money
launder.
As Silvia:
James arrives in
front of his flat.
A woman identifies
him from a picture and rushes to get to him. She is hit by a car.
James tries to
help her and sees a gun. She asks not to be taken to the hospital. James brings her
to his flat.
Learn about
Silvia.
Answer James in
any way.
James asks about
the picture of himself and Cristoforo.
James is
frustrated in not getting any straight answer from Silvia. He turns off the
light and goes to bed.
Make a trap: 2 hrs. later,
Silvia says that she didn't finish the job and that they will send another to
do so.
Turn on the lamp
on the coffee table at center of room beside the sofa.
Click on the boxes
beside the door and she mentions preparing a trap.
Take the blanket draped over one of the boxes.
Take the mop-rag
by the window.
Pick up the pillow
from the sofa.
Combine the
mop-rag with the blanket. Combine that with the pillow to make a puppet.
Use the puppet on
the couch. This will fool for a short time the ones they will send for her.
Turn off the lamp.
Hide behind the boxes at left corner.
Someone is coming.
Watch what
happens.
ACT 2: WRATH
March 2014
A synopsis of Act 1 is seen. Silvia, an assassin sent
to kill James kills another assassin sent to kill her because she did not finish
the job.
SILVIA.
James' flat:
There's a mobile phone in inventory.
Assassin: Check the
corpse of the assassin to get car keys. She also sees a gun.
A hysterical (definitely not tough sounding) James
points the gun at Silva.
Responses:
Tell about friend - Provoke.
Who sent you here? - I won't talk.
Find out who that man was from - Serial
number.
Silvia locks James in the bathroom.
Find out who sent the killer:
Talk to James in the bathroom.
What do you want from me? Killers.
James mentions Pietralata - The Raja. That
clued Silvia that Massimino is behind this contract.
Silvia finds Morgana the gun under
the pillow. Exit.
Take care of the corpse:
Take the blanket off the decoy on the couch.
Use the blanket on corpse.
Exit the apartment. The corpse is in
inventory.
Use-left click the assassin's car keys. See the
car at left beep.
Use the corpse on killer's car.
Use the killer's car to go to the city at end of
the street.
Outside the Raja at Pietralata:
Silvia is parked across The Raja. See 3 goons
guarding the entrance of the club.
Take care of the first goon: See the
inside of the car in an inset.
Open the trunk of the car by clicking on trunk
opening.
Turn on the headlights.
The goon by the door walks over to the car.
When he stands by the car door; open the car door.
Search the goon to get a knife and
goon's clothes.
Click on the goon to place him in inventory.
Pick up the senseless goon from inventory
and place him in the car trunk.
Take care of the second goon:
Left click the goon's clothes in inventory to get
Silvia to wear it.
Click on the goon by the stairs at right side of
the building.
Select point at the trunk.
When the goon comes over and stands by the car
trunk - click on car trunk.
Silvia hits him with car trunk door and places him
on car seat.
Silvia gets a belt and brass knuckles.
Take care of the third goon: The
third goon is patrolling the balcony.
Check the post beside the car and the cable that
connects to the balcony.
Watch the goon on the balcony. When he turns his
back to the street; use the belt on the cable.
Silvia slides to the balcony and hits the goon.
Use the knife on the cable. Use the cable on the goon.
Get rid of the guard inside the building:
Enter the building through the upper entrance. See
the Marchese reprimand the goon and close the curtain.
Open the curtains: Look
around.
Take a billiard cue and the mirror
from the balcony.
Go out to the balcony and down the street to the
trash can-rubbish bin.
Look in rubbish to get a tourniquet. Go
back to the balcony and upper entrance.
In inventory, combine the billiard cue with the
tourniquet.
Combine the cue with tourniquet with the knife to
get a bayonet.
Use the bayonet on the curtain. The curtain opens
halfway.
The guard looks through the half opened curtain.
Catch the attention of the Marchese:
Use the mirror on the banister.
Make a knot: In
inventory combine the cable with the belt.
Select knots: 2, 3, 2 and 1. Ahoy, Matey!
Use the cable on the buckle with the mirror.
Use the mirror with cable on the banister.
The Marchese orders the guard to leave.
Use the gun on the Marchese. Silvia confronts the
Marchese.
JAMES.
Inventory has mobile phone, notepad, Capena
postcard, gun, scalpel, Cristoforo's briefcase with documents, Yallop's book
and wallet.
Right click the briefcase with documents to get
bank statement.
James says that he lost his bible - possibly in
the car.
Get out of the bathroom:
Check the door lock to see that Silvia did leave
the key in the lock.
Check the baseboard of the door.
Look around. Take the rubber gloves and
mirror from bottom cabinet at back wall.
Take the curtain rod.
Radio: Take the
antenna of the radio.
Use the scalpel on the radio to get 9V battery.
Check the cable of the radio. It is stuck to the
socket.
In inventory combine rubber gloves and scalpel.
Use the insulated scalpel with the radio
cable to get cable.
Work on the door:
Use the antenna on the lock of the door. The key
falls off at other side of door.
Use the curtain rod on the baseboard. It is too
big.
Use the gun on the curtain rod. James flattened
one end of the curtain rod.
Use flattened rod on baseboard.
Get key: Try the antenna
on the crack under door.
Use cable with antenna.
Use the antenna with cable with battery to get
magnetized antenna.
Use magnetized antenna on crack under door to get
bathroom key.
Use bathroom key on lock. James hides the gun before leaving.
The Raja:
James arrives at the upper room of The Raja.
Silvia points the gun on Marchese - Bartolomeo.
Silvia wants to know where Massimino is.
Silvia tells James to look for something useful.
SILVIA:
Change character by clicking on the character icon
at left end of the inventory bar.
Talk to Marchese. Ask about Massimino and James.
JAMES:
Desk: Check the desk
behind the curtain area.
Get a property license of a beauty park
owned by Marika and a ring.
Learn that the ring was left by Massimino before
he disappears for a while.
Click on the suits icon at bottom center. The suits are
scary guys. The ring is used as an access to a password.
Check the beauty farm documents in inventory.
Sofa: Check the sofa to
get a hair lotion sample from a beauty farm. Get the farm's address and telephone
number.
Safe: Check the center
panel on the wall to see a safe. It needs a 3 digit code.
SILVIA:
Get safe code: Ask
Marchese about the safe code.
Hit him twice. Marchese refuses to give the code.
Take the brass knuckles from inventory and use on
Marchese.
Ask about code. Marchese gives the code - 804.
JAMES:
Safe: Automatically be
James. Enter 804 on the keypad. R is reset and O is OK.
Get a leather strip with numbered and letters.
Marchese: James tries to
stop Silvia from killing Marchese. Silvia kills Marchese.
The guard arrives followed by the police.
Silvia escapes. James and the guard are arrested.
James recalls his interrogation and Cardinal
Brehmen.
James is released and is met by Silvia. Silvia
takes James home. She gives him her phone number in case James wants to contact
her.
Learn about Maurizio Tarso alias Massimino.
James didn't find his bible in the car. He gets the car
keys back.
James' home:
Check the table and Mario's bar. Mario is not
there.
Enter the flat.
Talk to Mario who fixed the TV. The TV is on.
Ring: Check the ring in
inventory. James makes a sketch in the notepad.
Examine the notepad. Click on the drawing.
Turn the page of the notepad. The symbols on the
ring are crowned head, square ruler and compass, she-wolf, gladius and
Vatican.
Computer: Open the
computer. Click on web
search.
See and click on the symbol drawing at left.
Symbology is entered automatically on the search
page. Click "search".
Learn that House of Santa Brigida has the History
of Symbols book by Davide Cutolo.
Close the screen by clicking the X at top right of
page. James says to check the nuns.
TV report: See a TV news
report. Giorgio the
reporter is in the scene of the murder of Roberto Evola. Evola was killed by
gunfire. See James' bible beside the body.
Crime scene:
James goes to Evola's house. The bible is not
seen.
James talks to the police. Learn that a neighbor
called the incident - not the reporter.
Talk to the reporter. He denies that there is
anything beside the body.
Find the bible: Check the
garbage bin. The reporter snitched to the policeman.
When the policeman starts talking to the reporter,
use the mirror on the back of the garbage bin.
See something attached to a tape behind the
garbage bin.
Again wait for the policeman to be distracted by
the reporter and then use the antenna on top of the garbage bin.
Get James' bible and Evola's organizer.
Exit the scene.
Santa Brigida's House:
Go to Farnese Square. Check the building at left -
Farnesina the HQ of the Italian Foreign Ministry and Santa Brigida Church.
Enter Santa Brigida's House left of the church.
Sister Bigmouth: Meet the
nun again. Talk to the sister. The nun has a headache due to drinking the
whole bottle of Grappa James gave her.
Sister Candida knows that James will bring more
problems. In exchange for a remedy Sister will get the symbology book. Coff,
coff! LOL.
Make a hangover remedy:
Go back to James' home. Enter Mario's bar.
Talk to Mario. Get a paper cup and Vodka.
All the ingredients for the remedy is in the fridge at James' flat.
Go to James flat and open the fridge. Get
multivitamins, egg, energy drink and Tabasco.
In inventory, add vodka, then egg and then Tabasco
to the paper cup to get remedy. If a mistake is done, empty the cup in the
sink.
Get the symbology book:
Use James' car to go back to Sister Candida.
Give her the remedy. Get the Nun's Symbology book.
Check the symbols:
History of Symbol:
Open-right click the History of Symbols book in inventory.
Click on crowned head on the notebook. Learn that
it is the symbol - Italian turrita that identifies the Italian country.
Click on square ruler and compass on the notebook.
Learn that it is a Masonic symbol. James wants to check the Yallop book
about this symbol.
Click on she-wolf on the notebook. Learn that the
Capitoline wolf is a symbol of Rome.
Click on gladius on the notebook. Learn that
gladius, a two edged sword is also a symbol of a secret paramilitary Italian
organization created to stop communist advancement in Europe. James wants to
pursue researching this.
Click on Vatican on the notebook. James knows all
about the Vatican.
Click on the symbol on the ring text in the
notebook. James cannot find a symbol with all the components of the ring.
Yallop book: Right click-open
the Yallop book in inventory.
Learn about Licio Gelli who worked as a spy and
got his riches by stealing some of the Yugoslav national treasures hidden in
Italian town of Cattaro. Gelli became a double agent of Italy and Germany.
Learn how Gelli established a lodge - P2 made up of powerful men in Italy.
Gelli's aim is to establish an extreme right wing control of Italy.
Bank Account:
Organizer: Check the
organizer. There is wooden pen inside the organizer.
Exit the page. Learn about a Monsignor connection.
James drew the DreamRes logo in the notebook.
Leather bracelet:
Check the leather bracelet taken from Massimino's safe at The Raja. It looks
like it cryptography used with a scytale.
Combine the wooden pen found inside the organizer
with the leather strip with numbers and letter. See G3D5M1D0 - code.
Code: In inventory,
combine the code with the IOR bank statement that has an incomplete account
number.
The code matches with the last digits of the
account number. See a new location.
Sister: Give the nun's
book back to Sister. Exit.
Porta Sant'Anna:
Go to the Porta Sant' Anna. It is one of the
active access point in the Vatican.
Gain access to IOR: Look
around. Check the symbol above the gate, Palazzo Sisto, IOR office and Swiss
guards.
Right click the walking guard. It is Gerard.
Talk to Gerard.
James says that he wants to access his IOR account.
Show the IOR bank account. Gerard escorts James
inside the IOR bank.
Access account: James is
frisked by the guards.
Go to the ATM.
Using your own keyboard, enter the account number - the code
G3D5M1D0-. Remember the number one after the M,
the zero after D and minus at the end.
Press enter key.
Click on the second selection to print an
updated bank statement.
Study account: Open the
updated account statement and check the transactions.
Click on the earliest transaction in June 9, 2010.
The amount 650500 looks familiar. Exit.
Combine the updated account statement with the
property license of the beauty farm.
Click on the 650,500 (sum) on the property license and
then the ATM withdrawal (sum) in the updated bank statement.
It was sold the next day for the same amount. So
Massimino has access at the same account Evola has.
James says he needs to contact Silvia.
Automatically transfer to Silvia.
SILVIA.
Beauty Farm:
Silvia enters the beauty farm. See people in the
tanning area. They closed the curtain.
Talk to Marika. Marika talks about Maury -
Mauricio/Massimino.
Silvia is scheduled for tanning but has a long
wait.
Get the employee and the costumer to go away:
Check the notice board behind Marika.
See that she has 2 employees. The one behind the
curtain must be Claudio.
Check the curtain and overhear Claudio wants to
be famous and is waiting to be called by people from show biz world.
Use the cell phone with the sample that has the
phone number. Select casting dialogue.
Claudio tells the customer that he's done. The
customer leaves. Claudio gives an advice to Marika.
Marika: Talk to Marika
now that they are alone. Marika is forced to work and brings Silvia to the
tanning area.
Look around. See the bottle compartment under the
tanning bed, herbal bottle on the top shelf and file cabinet.
Get Marika to contact Massimino:
See Marika go back and forth from computer and TV.
Check the flat screen TV on the wall. Select the
news from Rome about The Raja murder.
When Marika sees the news, she goes out and calls Massimino. Massimino will text her where he is located.
Marika checks the doorbell.
Get the phone from Marika:
Take the Valerian herbal bottle from top shelf.
Take the bottle from the compartment under
the tanning bed.
Open the bottle from tanning bed with the knife.
In inventory combine the 2 bottles. Place the very
strong herbal bottle back in the compartment under the tanning bed.
Talk to Marika. She lies down and checks the bed.
She falls asleep.
Click on Marika to get her cell phone. Check the
cell phone in inventory. Silvia now knows where Massimino is located
JAMES.
Mario's bar:
Automatically change to James. James calls Silvia
for a meet. Silvia says that they'll talk at the Mario's bar.
James goes to the bar and sees Cardinal Brehmen.
The same clergy that sent James and his mentor Dellerio to Africa. The
Cardinal is also Cristoforo's direct superior.
The Cardinal warns James and moves away.
James waits for Silvia. Silvia is still not here.
Read the document on table:
Go back inside the bar. See Brehmen reading documents on the table.
Go left of Brehmen and then look-right click at
the documents on the table. James says that it has a seal that looks
familiar.
Talk to Mario completely. He will do a
distraction.
Mario approaches Brehmen and spills coffee on his
cassock. They leave to clean his cassock.
Read the document. It is a letter from Mons. David
Lavint the Director of IOC. It shows that Brehmen knows about the activity
with the bank and investigation done by Cristoforo.
James copies Lavint's seal in the notebook. It
shows the binding of Isaac.
Brehmen takes the documents and leaves the bar
Silvia's call: Exit the bar and
get a phone call. James answers the phone automatically.
Hear Massimino and his guard talk about what to do
to a captured Silvia.
The baddies mention that they are in a gallery.
James says that his phone records the call for
playback to get a phone call recording.
Find out clues where Silvia is kept:
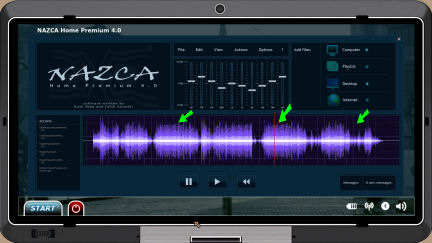
Go back to James' flat. Use the computer.
Click on the speaker icon of Nazca Home Premium
4.0. James already plugged the recording.
See audio pattern. Click on the play-right arrow
to move the red bar to right.
Click on the stop button to see if what is heard
is important.
Stop the recording on the 3 spots shown in the
picture above. The locations of the clues might be random.
The first clue is the sound of bus opening its
doors - a bus stop.
The second clue is where Historiae Jonae by
Giacomo Carissimi music is
performed - Giacomo Carissimi.
The last clue is mentioned at the endof recording - gallery.
Exit by clicking on X at top right.
James prints out a map of Rome.
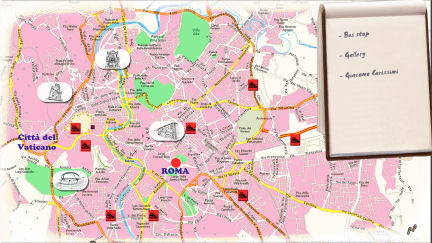
Deduce where Silvia is kept:
Click on the map at inventory and the clues at right.
Click on the auditorium clue - Giacomo Carissimi
on the map. James marks the
map to show icons where there are auditoriums.
Click on bus stop clue and click it on an
auditorium. Do this to all the auditoriums. James will say if any of them are close to a bus stop. Only 2
are close. The rest of the auditoriums are removed.
Click on the gallery clue and then click the icon
on both auditorium to see which one is close to a gallery.
James now knows where Silvia is kept - Alberto
Sordi Gallery.
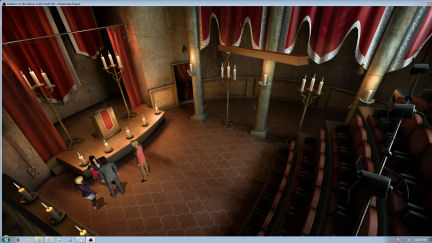
Alberto Sordi Gallery:
Go to Alberto Sordi Gallery in the map. See a
fortune teller and his show table. There is a photobooth at right.
Fortune Teller: Check the
table. See Silvia's earring on the table and a crystal ball.
Talk to the fortune teller. Ask about the earring.
Cups game:
The fortune teller will talk about the earring if you guess which cup has
the earring.
See the 3 cups game. The cups are rotated.
Check the table skirt. Use the magnetized antenna
on the table. The right cup jumps. James selects the correct cup.
The earring was found by the photobooth. The
Romanian tells James' fortune. That troubled James.
Intercom:
Go to the photobooth and see a poster on middle column. James rips the
poster off an intercom.
Open the door: The intercom
says - The start of LG's rise to success.
Review Yallop's book about Licio Gelli - LG. Gelli
joined a conventional Masonic Lodge in November 1963.
Enter 1963 on the intercom keypad. The door opens.
Get Silvia free:
See Silvia tied up and interrogated by the
criminals: Massimino, Marika and Marchese's guard.
Plank and pulley: Look around
at the theatre. See the stage, the pulley at base of
the middle column and the cable on the left side of the stage.
The pulley
and the cable are tied to a plank by the ceiling.
Change to Silvia: Click
on the cable left of the stage. This moves Sylvia close to the wheel holding
the cable.
Silvia cuts the rope.
Move the chair close to right side of the stage so
that the criminals are in position under the plank close to the ceiling and
away from the post with the pulley.

Change to James: Use the
scalpel on the pulley. Make it or break it!
Interrogate the criminals:
The criminals are the ones tied now. James asks
for a chance to find out who's pulling the strings. He must hurry before
Silvia decides to kill them.
Show the ring to Massimino. With Silvia's backup,
they play with Marika and Massimino's relationship.
Show the Beauty Farm documents to Massimino.
Marika questions Massimino about the church and the theatre locale.
Massimino talks. Learn about a Monsignor who wants
a man in this kind of neighborhood. The crypt are used to hide certain stuff
and places like the gallery are when times get rough. He was given access by
the suits.
James talks to Silvia. He verifies that the threat
to Silvia will not stop until they reach the top man. He drops his car keys
on Silvia's hands.
St Appolinare's Church:
As Silvia: See the tomb of Monsignor Antonio Dellerio, James'
mentor. James needs to compose himself.
Use the knife to remove the plaque off the tomb of
Dellerio.
Inscriptions: See Latin inscriptions,
number roller bar and lock. At bottom left are the
Roman numerals - 1978.
Left and right click the inscriptions. James
translates the inscriptions. He says they are from the same episode but from
3 different gospels by Mark, Matthew and finally Luke.
Mark, Matthew and Luke = M + M + L = 2050.
Enter 2050 on the roller bar.

Pact: Silvia opens the
tomb. James reads the scroll. He notes the seals of the signatories to the
new P2 pact.
The seal on top is the one from Massimino's ring.
The last 2 at bottom is Evola - DreamRes and Lavint's - IOS.
Economics, Politics, Information, Religion.

No checkmate; not this time!
This document may not be
distributed without express written permission of the author and the content may
not be altered in any way.
For Questions or Comments
on this Walkthrough,
Please write to:
MaGtRo
Copyright © 03/2014 MaGtRo
 GameBoomers
Walkthroughs and Solutions
GameBoomers
Walkthroughs and Solutions