
Shadows by the Waterhouse
A walkthrough by Raphael Vogt, Developer
Publisher, Novel Games
Walkthrough Chapter 1
In the Afternoon
After the intro click on "Chapter 1.” At the first scene (small wall) go left, then left again. Sort the card out of wooden boards. Follow the forest path to the chapel and look around. Where the map is on the left, go to the cemetery on the right and talk to the doctor.
Head back to the first scene (small wall). Go straight. At the next scene on the left, find and take the tape recorder in the bushes on the right (click on the battery compartment several times).
Go to the next scene after that on the left to the junkyard behind the wall. Find and take the batteries out of the container there.
Pass the house, and go down the stairs on the left. Look around there to the right and left. Take a pencil from the window sill to the right of the stairs (view from below). Open the manhole cover near the gutter and take the medicine bottle. Go straight forward. At the next building look left to the gutter. Overhear a conversation. Then pick up the mailbox key.
Go straight ahead two scenes, then left. Use the pencil with a notepad found on the left under the parapet.
Go back one scene to the bridge and look to the right at the river. Look at the railing to the left (a message has been scratched there). On the opposite side (river weir) ducks swim on the dammed water surface. In addition, see an old boot that can be taken out later with a suitable object. At the end of the bridge there is something wobbly on the wall that can also only be fetched later.
Go left. Then go left twice more to end up under a bridge. Find and take the fishing rod with you.
Go left twice and straight ahead twice. Then go to the right several times to where the ducks are. Fetch the boot with the fishing rod and note the mark on the sole of the shoe.
Head back to the wall. Take the loose angle iron and combine it with the fishing rod. Go to the scene with the ducks and all the way down to the water basin. Combine angle iron with tang. Fish out the clown mask on the right edge of the picture. Open the right mailbox with the key. Find a tape and combine tape with tape recorder and batteries. Place the tape recorder on the light shaft grille next to the stairs and listen.
Then go left. Click on the square recess in the house wall. Read the code for hologram opener. See poem: tent = triangle, 9 o'clock = point left, night = black.
Go down through the grill door. Take the keyboard out of the closet and combine the mask with the camouflage jacket.
In the Evening
The garage is now also open. Click on the book on the left, take the list of names with you. Go back to the cemetery. Have another conversation with the doctor. If questions are asked, give him the medicine bottles. Continue dialogue. The doctor gives you a code. After the conversation, look at the gravestone inscription and decipher the code (301202). Remove the tape recorder from the light shaft. Listen to a new recording.
Turn right when looking at the hall gate. Plug the keyboard into the high voltage socket and enter the numerical code (301202). Open the hall door, click on the entrance. Place camouflage clothing onto clothing symbol. Enter the hall. Look around (bookshelf etc.). Click on the small window in the railroad car. Have a conversation with the prisoner. Then enter the adjoining room. Look through the window into the treatment room. There is someone standing there. Tell the gangster that someone has been brought in to be lured into the hall. Tell about the secret sign and ask for the flashlight. Give name list. The correct name is "Jacob Frank.” Look at the mirror over the sink. Turn the mirror over and shine the flashlight on it. Return flashlight. Back in the big hall behind the train car, wait until the "real" boss comes. Then quickly go to the bookshelf to use the secret mechanism (pull the second book from the right). Click on the fig leaf for Adam and Eve.
Walkthrough Chapter 2
Waterhouse
Talk to the policeman, the doctor and the freed prisoner. In the cellar/bunker go right under the water channel, pick up coins. Further to the right, inspect the map and coat, take the string with you. The map can also be inserted (click on the skull symbol).
Go into the great hall behind the doctor, then right to the old railway car. Inspect the car using a headlamp. Have a second conversation with the prisoner and the doctor. Leave the hall (where the police car is). Then go straight to the car.
Test Drive 2.5 Mini Game
Find the Test Drive 2.5 Mini Game. The mini-game sequence can either be repeated as often as desired or just leave after the first attempt ("leave").
Railway Station
Leave the car and enter the station concourse. Look around. Go to the underpass. There go left (towards tracks 4/5). At the top of stairs, go left. Talk to a train conductor. Go back to the underpass, turn 180 °. Go to Platform 1 (large stairs at the top left). Speak with the platoon leader. Go back to the station hall. Click on the extra sheet at the newspaper seller and read. Continue the conversation with the driver. Then enter the locomotive.
Train cockpit/driver’s cab
In the train cockpit/driver's cab, place the map under the reading lamp and click on the skull. Operate the drive lever. When the locomotive reaches the end of the bridge, stop. Use the card again. Decide on alternative route "S2". Wait for the green light, then continue driving.
Industrial Area
At the Industrial Area Leave the train cockpit/driver's cab (left). Inspect the area on the right (construction crane, cigarette machine). Walk to the forest path (in the direction of the street lamp). In the next scene, click on the pile of stones in the middle. Take out the note between the stones. Go straight three times, then left. Click on the hall door and look at coffins. Then go two scenes back and from there go twice to the right. Go around the hut.
Inn
Enter the inn. Go left to the dining room and sit down at the table. Follow the table conversation between the two gentlemen. Talk to the landlady (order breakfast). Keep listening and talking. As soon as the others have left, click on the key rack behind the counter and take the key at the bottom left.
Go upstairs. Press the doorknob of the first door on the right, take the telescope from the table. Enter the third room on the right as well, listen to the woman's voice. Open opposite (third room on the left) with the key, look around. As soon as the upper drawer has been opened, a Polaroid photo can be seen when opening the lower drawer. Click on "Help," close the drawer. Go downstairs.
Go straight through the door below (next to the stairs). Answer with the code word "Franzl."
Leave the inn and turn 180 °. Follow the path to the crossroads. Go right to the Industrial Area.
Industrial Area
Look at the cigarette machine. Insert coins. Open the second compartment from the right, take the USB stick.
Get on the crane. In the crane cockpit, look at the note to the right of the screen and put it with the other half of the note in inventory. Look out of the window. Use the telescope on the roof of the hut and look at the signpost. Turn on the computer, click up. Click on the fourth desktop icon from the top. Use the USB stick on the PC tower. A new file will now appear on the desktop. Click and read. Look at the characters, click the up arrow, then click the rotated triangle. Desktop: Click on the uppermost icon "Intranet." Enter "All-seeing Internazionale Pyramidler." (The supposedly wrong spelling reveals something about the attitude of the secret society). Click on "Cam 1 - 8" and listen to the prisoners' conversations. Exit the crane.
Go left of the cigarette machine back to the crossroad.
Lake Area
At the crossroad go straight to the gate and open it to go to the Lake Area. Take a stone in front of the hut.
Go past the hut (straight ahead several times) to the water mechanism. Use a stone with the crank, take the crank with you.
Step onto the jetty. The cover at the end of the jetty cannot be opened (yet).
Secret Mechanism
Go back to the path at the inn. Click on the hole in the ground to find a secret mechanism. Lift up the wheel and place it in the hole. The wheel is a signpost which points to the left.
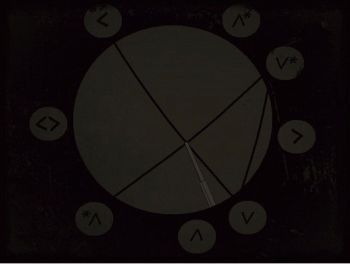
Go left and cross the large meadow and go left into the forest. At the hut go right. Look at the signs on the trees. Click on the forest floor, then on the large pointer. Drag the slip of paper with the code into the middle of the graphic, use the string as shown in the picture. Click where the string crosses (to move the pointer there).
Underwater Container
Return to the lake. Now you can open the cover at the jetty. Climb down the ladder, open the hatch to the containers. Inspect the residential containers. Insert the crank in the device to the left of the water pipe. Open the hatch to the laboratory rooms. In the first laboratory container, take the phone card from the desk. In the second, take the brain from the shelf on the right. Look behind the curtain at the end of the last laboratory room.
Go back to the living container. Click on the screen and watch the sequence.
Phone Booth
Enter the phone booth opposite the inn. Look at the poster. Use the phone card and dial the number of "Jason's Flying Taxi Service" (301202). Wait until the air taxi lands to the right of the phone booth. Talk to Jason and give him the brain in a glass. Enter the taxi.
River Weir
Talk to the policeman and the doctor in front of the water house. Go to the doctor's apartment (by the mailbox) and ring the bell. Enter the apartment. Look around the dark room. Click on the large pane of glass. In the next room there are two apparently identical doctors. After the dialogue sequence, the "right" doctor gives a sign. Click on the switch to the left of the glass pane.
Marie
In the final dialogue with Marie there are two dialogue options, each of which leads to a different end.