| | |||||||||||||||||||||||||||||||||||||||||
| ARRIVING IN MESOPOTAMIA | |||||||||||||||||||||||||||||||||||||||||
| Examine every location thoroughly as there are numerous inventory items to collect. Conversations with the various characters provide important information, so listen carefully to what they say. | |||||||||||||||||||||||||||||||||||||||||
| After talking to Kate, make your way toward the village. Along the way you meet Zirek, the herbalist. Fortunately Kate understands his dialect and translates what he says. He talks about the foreigners who desecrated the Temple of Marduk, his poultice for curing snake bites and Omarim, the healer. Offer him the pearl and he gives you the herb poultice in exchange. | |||||||||||||||||||||||||||||||||||||||||
| FINDING OMARIM | |||||||||||||||||||||||||||||||||||||||||
| Talk to the woman (you later find out her name is Azade) baking bread outside her home. She says Omarim is crazy about her honey bread and she's prepared to bake it if you bring her some honey. She tells you to take the matches, but doesn't know where the smoke bellows are. Pick up the box of matches lying on the ground next to her. | |||||||||||||||||||||||||||||||||||||||||
| You hear muffled noises coming out of the large wooden crate outside the house nearest to where you entered the village. Did you find the iron bar in the wheel of the broken wagon? Use it as a lever to lift the wooden crate and free the little girl (Jyan) who was trapped inside. You also find a smoker that was hidden under the crate. Jyan tells you about her uncle Samal who cuts stones and paints them different colours. | |||||||||||||||||||||||||||||||||||||||||
| Go up the mountain path to find the beehives. Light the smoker with the box of matches, then use it to chase the bees away from the beehive. The next part is a little finicky as certain actions are done without the lit smoker and others while holding it. | |||||||||||||||||||||||||||||||||||||||||
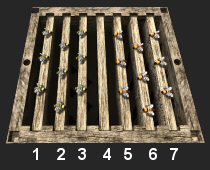
| First put the smoker back in your inventory and remove the roof of the hive to reveal a row of seven frames of honey. You must move the three rows of yellow bees on the left to the right and move the orange bees on the right to the left. A row of bees can only move forward, either to a row directly in front of it (if unoccupied) or it can jump a row of the other coloured bees to an unoccupied row. You must be holding the lit smoker when moving a row of bees. | |||||||||||||||||||||||||||||||||||||||||
| Your strategy should be to always ensure that bees of the same colour are kept one row apart. | |||||||||||||||||||||||||||||||||||||||||
| FIRST BEE PUZZLE | |||||||||||||||||||||||||||||||||||||||||
|
| |||||||||||||||||||||||||||||||||||||||||
| Click on the following rows: | |||||||||||||||||||||||||||||||||||||||||
| |||||||||||||||||||||||||||||||||||||||||
|
| |||||||||||||||||||||||||||||||||||||||||
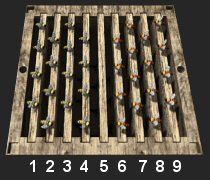
| On completing the first puzzle, replace the smoker in your inventory and try removing a frame (row) from the beehive to trigger the second puzzle. You need to again hold the smoker to move the bees in the second puzzle. | |||||||||||||||||||||||||||||||||||||||||
| SECOND BEE PUZZLE | |||||||||||||||||||||||||||||||||||||||||
|
| |||||||||||||||||||||||||||||||||||||||||
| Click on the following rows: | |||||||||||||||||||||||||||||||||||||||||
| |||||||||||||||||||||||||||||||||||||||||
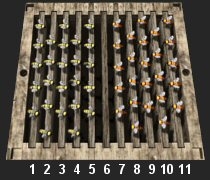
| On completion of the second puzzle replace the smoker in your inventory and try removing a frame (row) from the beehive to trigger the third puzzle. Once again you need to hold the smoker to move the bees in the third puzzle. | |||||||||||||||||||||||||||||||||||||||||
| THIRD BEE PUZZLE | |||||||||||||||||||||||||||||||||||||||||
| | |||||||||||||||||||||||||||||||||||||||||
| Click on the following rows: | |||||||||||||||||||||||||||||||||||||||||
| |||||||||||||||||||||||||||||||||||||||||
| After completing all three puzzles remove the centre frame (full of honey) and take it to the woman. While she bakes the honey bread, either wait for Omarim or continue exploring until he arrives. | |||||||||||||||||||||||||||||||||||||||||
| Omarim tells you that he has spoken to Marduk, who is watching over you and the object you have. Give him the bronze medallion and he speaks about you being descendants of Atlanteans. After his 'vision', talk to him again. If you found Captain Blackwood in one of the empty houses (and you tried talking to him) a dialog topic about him is triggered with Omarim. If not, you need to look for him and then return to discuss the topic with Omarim. | |||||||||||||||||||||||||||||||||||||||||
| OMARIM'S REMEDY | |||||||||||||||||||||||||||||||||||||||||
| Omarim offers to mix a tincture to cure Captain Blackwood if you bring him some aloe leaves. You won't find the aloe leaves without help, so go to Zirek, the herbalist. He suggests that you look near the beehives. There's an aloe growing on the corner of the path directly opposite the beehives. Note that you won't be able to take it unless you've first spoken to Zirek about it. | |||||||||||||||||||||||||||||||||||||||||
| If you haven't traded the pearl for Zirek's herb poultice, do so now to avoid an untimely death! | |||||||||||||||||||||||||||||||||||||||||
| Take the aloe and give it to Omarim. When you now talk to him he gives you his remedy. In keeping with the 'betrayal followed by redemption' part of the prophecy, take Omarim's remedy to Nathaniel Blackwood and give it to him. | |||||||||||||||||||||||||||||||||||||||||
| JYAN'S DOLL | |||||||||||||||||||||||||||||||||||||||||
| Jyan has dropped her doll into the well in the centre of the village. You find a bucket near the broken wagon, but it doesn't have a handle. Did you notice that part of the barbed wire fence along the path between Zirek and the village is lying on the ground? Use the shears (found on the wall in the house where Blackwood was) to cut off a piece of twisted metal wire from the loose fence and attach it to the bucket. Now latch the bucket onto the hook (at the well) and lower it by turning the handle on the right of the well. Retrieve the doll and give it to Jyan. | |||||||||||||||||||||||||||||||||||||||||
| Speak to Jyan about the key to her uncle Samal's house. Note that this dialog topic is only triggered after you've tried opening the locked door to his house. As uncle Samal doesn't have a doormat, he hides the key under a piece of wood in front of his house. | |||||||||||||||||||||||||||||||||||||||||
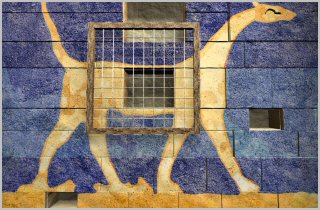
| DRAGON OF MARDUK | |||||||||||||||||||||||||||||||||||||||||
| On the right hand wall inside the Temple is a large bas-relief depicting the Dragon of Marduk. Study the bas-relief carefully, noting the different colours and that there are four missing stones. Measure the size of the missing stones by placing the grille (found on the wall outside uncle Samal's house) over each hole. As depicted in the graphic below the hole in the centre measures 5 X 4. The size of the hole at the top is 6 X 6 and both remaining holes measure 3 X 2. | |||||||||||||||||||||||||||||||||||||||||
| | |||||||||||||||||||||||||||||||||||||||||
| There's a pile of stones outside the Temple entrance. Pick up four stones and go to uncle Samal's house. The stonecutter's key is under the wooden pole to the left of the door. Use the key to unlock the door and enter the house. Take the stonecutter's tools from the window sill and go back outside the house. The grid painted on the large slab is used to measure and cut the stones. Place each of the stones on the grid and cut them to the required sizes with the stonecutter's tools. Initially all the stones measure 8 X 6 and must be cut as follows: | |||||||||||||||||||||||||||||||||||||||||
| |||||||||||||||||||||||||||||||||||||||||
| Note that you can only carry four stones at a time. So if you cut a stone to a wrong size and want to get rid of it, simply cut until it crumbles, then go back to the Temple and fetch another one. | |||||||||||||||||||||||||||||||||||||||||
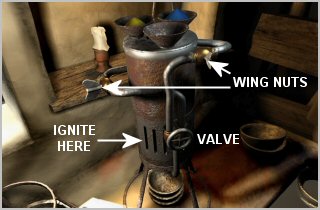
| The contraption on the stonecutter's workbench is a paint mixer used to produce different coloured paint from three basic pigments. Initially two of the funnels at the top of the paint mixer are filled with blue and yellow pigment, so you need some red pigment for the third funnel. | |||||||||||||||||||||||||||||||||||||||||
| Return to the Temple entrance and use the hoe (found against the outside wall of the house where Nathaniel Blackwood was) to dig up the plant on the right and remove the red roots. | |||||||||||||||||||||||||||||||||||||||||
| There's also a pestle in a bowl on the stonecutter's workbench. Take out the pestle, put the roots in the bowl and crush them with the pestle. Place the sieve (found on the wall inside the house where Nathaniel Blackwood was) on the stand next to the paint mixer. Shake the sieve to make a red dye, which you pour into the third funnel. | |||||||||||||||||||||||||||||||||||||||||
| The paint mixer is steam powered, so use the box of matches to ignite it. The two wing nuts can be turned to either horizontal or vertical positions. The valve near the bottom empties the paint into one of the bowls under the contraption. | |||||||||||||||||||||||||||||||||||||||||
| | |||||||||||||||||||||||||||||||||||||||||
| The dragon bas-relief consists of four basic colours. To replicate these colours you must adjust the wing nuts to the following positions: | |||||||||||||||||||||||||||||||||||||||||
| |||||||||||||||||||||||||||||||||||||||||
| As with the stones, you can only carry four bowls of paint. To dispose of a bowl of paint, drop it into the tank on the right of the paint mixer. | |||||||||||||||||||||||||||||||||||||||||
| Take the cut stones and bowls of paint to the Temple. After inserting the stones into the appropriate holes, use the bowls to paint them as follows: | |||||||||||||||||||||||||||||||||||||||||
| |||||||||||||||||||||||||||||||||||||||||
| Did you notice the slot in the dragon's eye? Insert your medallion in the slot to trigger a cut scene in which you get the Atlantean crystal. You should also remove the medallion as you need it later. | |||||||||||||||||||||||||||||||||||||||||
| MEDALLION ROOM | |||||||||||||||||||||||||||||||||||||||||
| When Captain Blackwood first enters the Temple he says that 'to reveal the hidden door place your medallion on the sign of the trident and turn it so the spikes are pointing downwards'. | |||||||||||||||||||||||||||||||||||||||||
| The stone ring on the wall opposite the dragon bas-relief has a trident symbol at the top. Place your medallion on the symbol to rotate the ring, noting that the trident is now on the right. Rotate the ring a second time by placing your medallion on the symbol, moving it to the bottom with the spikes now pointing downwards. A section of the wall recedes, revealing the door to the medallion room. | |||||||||||||||||||||||||||||||||||||||||
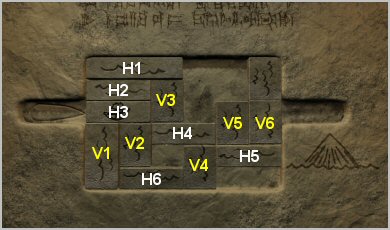
| To activate the slider-type puzzle on the door, insert the Atlantean crystal in the slot on the left. This can also be done to reset the puzzle. Certain tiles (prefixed with an H in the graphic below) are only able to move horizontally, while some (prefixed with an V in the graphic below) only move vertically. The directions in which a tile moves is indicated by the waves on it. The numbers used should help identifying tiles after they are moved. H1 is the first horizontal tile from the top, H2 is the second and so on. Similarly, V1 is the first vertical tile on the left, V2 is the second and so on. You have to clear a 'path' for the ark (H3) to move across and into the slot above the mountain. | |||||||||||||||||||||||||||||||||||||||||
|
| |||||||||||||||||||||||||||||||||||||||||
| Slide the tiles as follows: | |||||||||||||||||||||||||||||||||||||||||
| |||||||||||||||||||||||||||||||||||||||||
| Inside the Medallion Room you find Elliot's bag. Remove the torn-out page from the bag and study it very carefully. Also, take note of everything there is in the room. | |||||||||||||||||||||||||||||||||||||||||
| In the centre of the two large stone doors is a pedestal with three medallions on it. The nearest one is the copy that Elliot stole and it has melted. Remove this medallion and replace it with the genuine one to open the door leading to the Sanctuary. | |||||||||||||||||||||||||||||||||||||||||
| As you are about to walk through the door, Elliot suddenly appears and gives a new meaning to the expression 'taking the bull by it's horns'... | |||||||||||||||||||||||||||||||||||||||||
| TRAPPED IN THE PIT | |||||||||||||||||||||||||||||||||||||||||
| Before finding a way out the pit, you need some light. Examine the unlit torch on the wall, noting that you need some kind of fuel to light it. Talk to Kate about her scarf and she gives it to you. Attach the scarf to the torch, then light it with the box of matches. | |||||||||||||||||||||||||||||||||||||||||
| The notes on the torn-out page you got from Elliot's bag provide cryptic clues to your escape. Note that if you didn't remove the page from the bag previously, you can do so now as the bag is lying on the floor in the pit. The clues are highly cryptic and you have to do some 'thinking outside the box' to solve this puzzle. | |||||||||||||||||||||||||||||||||||||||||
| |||||||||||||||||||||||||||||||||||||||||
| After your 'grate escape' (excuse the pun) you finally get to Sanctuary. On board the ark is a panel with a grid of hexagons. Insert the Atlantean crystal into the slot above the panel to activate the grid and prepare for your final battle with Elliot! | |||||||||||||||||||||||||||||||||||||||||
| The objective of the puzzle is to plot a line (not necessarily a straight line) of hexagons between the blue rings at either end. You move first (blue) and Elliot follows in red. Elliot's moves are completely random, so it's not possible to provide an exact winning sequence. However, the sequence shown in the graphic below seems to work fairly often. Note that you might have to try it a few times before you succeed, so don't despair if you lose the first two or three games. | |||||||||||||||||||||||||||||||||||||||||
|
| |||||||||||||||||||||||||||||||||||||||||
| TO BE CONTINUED ? | |||||||||||||||||||||||||||||||||||||||||