Day Four | ||
25 September 1522 | ||
abou calls you from the window of her apartments. She tells you the manor is surrounded by guards. Fortunately the guards won't enter the manor, but when you go to the garden you need to avoid being caught by them. | ||
| You find Saturnin sitting at the table in the kitchen. When you confront him about spying on you, he explains that he cannot read. Accepting his explanation, head off to look for Babou. | ||
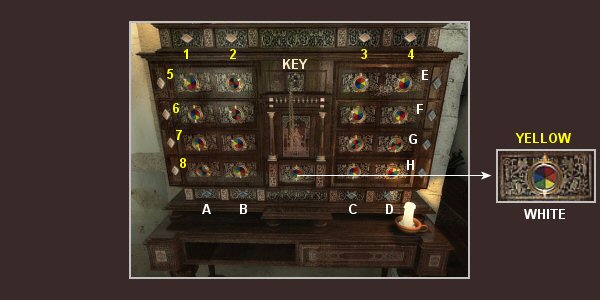
BABOU'S VENETIAN CABINET | ||
| The key for Babou's Venetian cabinet is on the mannequin inside her apartments. Remove the key and insert it in the Venetian cabinet. | ||
| ||
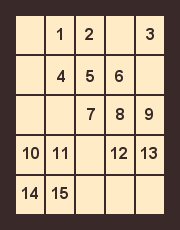
| As you did with Leonardo's Venetian cabinet, the design in the middle of the bottom row has to be duplicated. Study the design carefully, noting the yellow and white pointers on the top and bottom. You need to duplicate the positions of the pointers and not the actual design. In the graphic above the diamonds with yellow numbers (1-8) rotate the yellow pointers and the diamonds with white letters (A-H) rotate the white pointers. The solution is as follows: | ||
| ||
| In the drawer of the Venetian cabinet are the letter of introduction you gave to Babou and a stencil. Pick up the stencil and place it over the letter to reveal a 'hidden' message. | ||
| Babou claims that she was being blackmailed and tells you she was ordered to leave the Mona Lisa in the dovecot for someone to collect. In addition to finding the codex you must prevent the theft of the Mona Lisa. | ||
DECODE THE FOUR SIGNS | ||
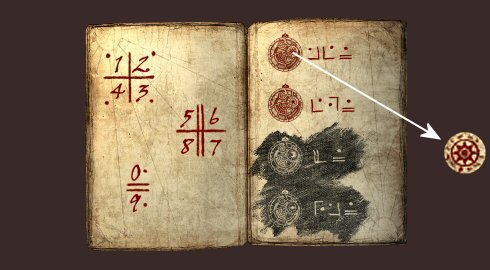
| Add the sheet of paper from King Francois to the portfolio. The symbols on it are the key to decoding the four signs on the adjoining page. | ||
| ||
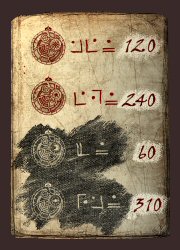
| The numbers 0 - 9 are represented by symbols on the left page. To decode the signs, click on each symbol on the right page and then click its corresponding symbol on the left page. When you click the first pair of symbols in each of the four signs the area to the right of the signs shows a shaded white area. After completing this for all four signs, take the blood stone and use it on the shaded white areas. You should now see four sets of numbers. | ||
| ||
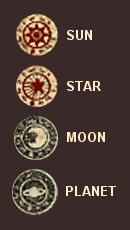
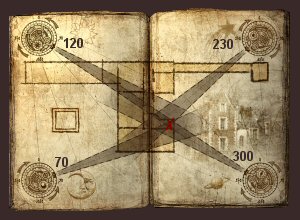
| The four round mechanisms on the right page also appear in the corners on the plan of Cloux Manor you got from Leonardo's Venetian cabinet. On the plan the mechanisms are marked in degrees between 0 and 360 (in units of 10) and can be rotated accordingly. Each mechanism also has a drawing (sun, moon, star and planet) next to it. The same drawing is also contained within each mechanism, as illustrated in the graphic above. The mechanism drawings are: | ||
| ||
| Rotate the mechanisms (on the plan) to the degrees you decoded and a red 'X' will appear at the point of intersection. When you examine the 'X' it shows that the manuscript is hidden somewhere in the front of the entrance to the manor. Valdo realizes that something is wrong as it's not logical to hide it outside. | ||
| Speak to Saturnin (in the kitchen) to learn he used to be Leonardo's valet. He was entrusted with the last key needed to find the manuscript and says: | ||
'You must subtract ten from the stars, then from the planets and add as many to the moon.' | ||
| Make the required adjustments to the mechanisms on the plan to reveal another red 'X' that indicates the true location of the manuscript. | ||
| ||
MANUSCRIPT | ||
| The chapel is through the locked door in the alcove next to the workshop. If you didn't do so previously, you must try opening the door to learn that it's locked. Again speak to Saturnin and he tells you that Babou has the key. | ||
| Go to her apartments and talk to Babou. Your choice of what approach you adopt with her is very important as it affects the possible endings to the game. | ||
CONCILIATORY APPROACH | ||
| If you select the second option (I shouldn't have lost my temper...) then nothing changes and Babou continues to show affection towards Valdo in the hero window. | ||
NON-CONCILIATORY APPROACH | ||
| If you select the first option (Me either, I must admit...) then she stops showing affection to Valdo in the hero window. Note that you can rectify this by giving her either the collar found on the staircase or Leonardo's jewel found in his Venetian cabinet. | ||
| Irrespective of which approach you adopt, Babou gives you the key to the chapel. Talk to her again and she asks you to come and say goodbye to her before you leave. | ||
| Unlock the door and enter the chapel. At the altar insert the signet ring in the slot below the fleur de lis. Pick up the sceptre and use it to turn the signet ring in the slot. Doing this opens a secret compartment in which you find the Manuscript by Leonardo Da Vinci. Lastly, remove the signet ring and sceptre. | ||
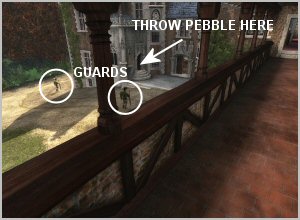
GUARDS OUTSIDE THE MANOR | ||
| Go to the tower at the end of the gangway. You need to find a way of distracting the guards below so that you can make your way to the dovecot. If you don't have any pebbles, you find some lying on the floor next to the tower entrance. Study the movement of the guards below to find the right time to create a diversion. | ||
| ||
| Wait until both guards are facing towards the manor, then throw a pebble at the door on the left. Now move quickly down the tower stairs and toward the revolving bridge. Although this is a timed sequence, it's not that difficult to do. | ||
IF YOU GET CAUGHT BY THE GUARDS | ||
| If you get caught by the guards while doing this, or at a later stage, they lock you up in your room. Examine the lock on the door to find that the key is still in it. First try to push the key out with either the knife, nail or drill bit. Next, slide a sheet of paper under the door for the key to fall onto. Note that if you don't have a sheet of paper in your inventory, you find one against the wall next to the bottom right of the door. Now push the key out and retrieve the sheet of paper and the key. | ||
| Examine the large tapestry hanging on the wall and Valdo realizes that Leonardo's bookcase also opens from this side. Use the pliers to remove the two nails at the bottom corners of the tapestry and then move it aside to reveal the bookcase. | ||
| The sequence you used in Leonardo's bedroom (S - A - L - A - I) doesn't work from this side. Knowing Leonardo's penchant for mirror writing, the sequence from this side should be quite easy to figure out. Click the books that spell his lover's name backwards (I - A - L - A - S) to open the secret passage. | ||
| Note that if you get caught a second time the guards kill you. Fortunately you can't actually die in the game and you're given another chance. | ||
GUARD AT THE BRIDGE | ||
| Fortunately the guard at the bridge is facing away from you, so there's no need to rush your actions here. There are two ways of getting past this guard. The easiest way is to whack him on the head with the iron bar. Note that you cannot do this if the white (angelic) level on the conscience gauges is excessively high. | ||
| Do you remember seeing Saturnin hiding his boat? You can avoid this guard by using the boat to cross the canal. Go to the canal bank (past the right rope and pulley) where you'll find the branches Saturnin used to cover the boat. Pick up the branches, pan to the right and put them down on the ground. Now use the boat to cross the canal. | ||
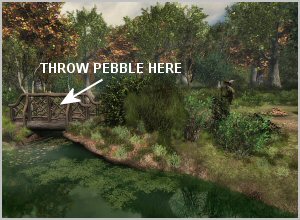
GUARD OUTSIDE THE DOVECOT | ||
| You must avoid the guard outside the dovecot, so go to the end of the path (where you found the reed) on the opposite side of the canal. Note that if you previously put the ladder across the canal at the point nearest the dovecot, you must use the boat to cross the canal. See the section on the 'Guard at the Bridge' above on how to do this. | ||
| You need the ladder to cross the canal at the point nearest the dovecot, so you must fetch it from where it is. Before going across the ladder you have to once again create a diversion. | ||
| ||
| Throw a pebble at the wooden bridge. When the guard goes to investigate, you quickly cross the ladder and enter the dovecot. Note that this is also a timed sequence and I suggest that you put the ladder across the canal before throwing the pebble. Note that if you don't have any more pebbles there are some lying on the ground. | ||
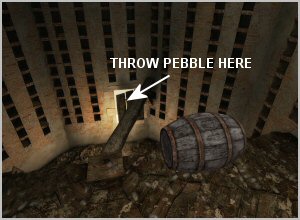
INSIDE THE DOVECOT | ||
| The Mona Lisa is hidden behind the bags. Remove the sheet and take the Mona Lisa painting. | ||
| Go to the upper ledge and give the signet ring to the black messenger pigeon. | ||
| There are two ways of escaping from the dovecot. In both cases you must get the guard into the dovecot. From the upper ledge throw another pebble at the window below to attract the guard's attention and he comes to investigate. Again note that there's a supply of pebbles in the dovecot if you don't have any left. | ||
| ||
| Look carefully to see that the guard is standing directly below the barrel. You won't be able to push the barrel by hand and need something to use as a lever. Use the iron bar, broom or a small stick to push the barrel over the edge and knock out the guard. You should now remove the guard's uniform and dress Valdo in it. This allows you to move around the garden freely. | ||
| Alternatively, you can jump out of the top window while the guard is inside. Before doing this pick up the pile of straw and throw it out the window so you have something soft to land on. | ||
RETURN TO THE MANOR | ||
| To get back inside the manor you need to get past the patrolling guards. If you knocked out the guard, and Valdo is wearing the guard's uniform, head directly for the manor. When they stop you, select the second response (Leave me alone...) and they allow you into the manor. If you select the first option (I've been told...) you're captured and locked in your room. To get out of your room see the section on 'If you get caught by the guards' above. | ||
| If you jumped out of the window, you need to avoid the guards to get back inside the manor. | ||
ENGRAVED PLATES - PART II | ||
| You still have one engraved plate (found in the cellar) to print. Use exactly the same process as before, then add the sheet of paper to the portfolio. It contains an entry about Alberti's grid, which is a mesh of wire stretched from nails that painters place in front of their model and use to define reference points. | ||
COPY THE MONA LISA | ||
| You use the two easels in Leonardo's workshop to copy the Mona Lisa. First place the original Mona Lisa painting in the wooden frame on the left. To create the Alberti grid insert a nail in the frame and then attach the sewing spool. Note that if you don't have the sewing spool you can still complete the puzzle even though the 'model' won't reflect a grid. Next, remove the blanket covering the easel on the right to reveal a blank canvas with a grid. Place the varnish and paints (found in the laboratory cabinet) into the slots on the right easel. | ||
| You must begin by drawing a sketch of the Mona Lisa on the blank canvas. There is no way of resetting the blank canvas, so I suggest saving a game before you start drawing. You use the charcoal crayon at the bottom of the right easel to sketch with. Clicking on a square changes that square and the squares on each of its sides. | ||
| ||
| After completing the sketch sixteen large dots are added at the inner intersection points of the grid. Click the squares to convert them to colour. This is a slider type puzzle and the dots are used to simultaneously rotate the four squares around it. | ||
| Thankfully a 'cheat' is available to complete the slider puzzle, courtesy of the indefatigable MaGtRo of GameBoomers. All you need do is minimize the game to the taskbar, then maximise it again and the slider should be completed. To minimise the game to the taskbar press either of the following keys: | ||
| ||
| You must now finish the blurred painting. Pick up the paintbrush, dip it in the varnish and one of the coloured paints, then paint the picture. Keep painting until Valdo is satisfied. This has to be done with all the colours, so clean the paintbrush on the cloth before changing colours. | ||
| When finished, take both the original Mona Lisa and the Mona Lisa copy. | ||
MEET HECTOR | ||
| You meet Hector in the underground passage. Give him the Manuscript by Leonardo Da Vinci, then talk to him about your escape to learn that he doesn't yet have a plan. | ||
FLYING MACHINE | ||
| Return to the kitchen and speak to Saturnin. He gives you a wooden bow to repair the flying machine's broken wing and insists that you recover the manuscript from Hector. He needs a smoke screen to hide your flight, and if you previously made a fumigant Valdo gives it to him. If not, he tells you to leave it near the flying machine. Should you not have the sugar needed to make the fumigant, he also tells you his door is open so you can enter his room and take it. | ||
| There are two dialog errors in your conversation with Saturnin. In the 'vision' he talks about Leonardo dying approximately '300 years ago' instead of '3 years ago'. He may not be what he seems, but he certainly isn't Methuselah! He also says 'After you have spotted...the flying machine...' when he means 'repaired'. | ||
| If necessary, go to the laboratory bench and make the fumigant. The process was described earlier in the walkthrough. | ||
| Go to the workshop and use the drilling machine to pierce the wooden bow. You must replace the thick drill bit with the thinner one (that was originally there) to do this. Also, if you used the small sticks to repair the ladder you need to saw the broom in half. You do this in exactly the same way as described earlier in the walkthrough. | ||
| You can now repair the broken wing with the bow made of perforated wood and the steering shaft with either a small stick or the wooden shaft sawed off the broom. Lastly, if Saturnin doesn't have the fumigant, leave it on the ground next to the flying machine for him to take. | ||
| ||
MANUSCRIPT AND MONA LISA | ||
| As per Saturnin's instructions, you must retrieve the Manuscript by Leonardo Da Vinci from Hector. You won't find him in the underground passage until Valdo hears a noise coming from there. To trigger this, walk around for a bit and then enter the kitchen. Now go down to the underground passage and once again wield your trusty iron bar to knock Hector out. | ||
| Note that you can't use the elevator to get there, so if you didn't previously fire the cannon at the bricked up section of the wall, you must do so now. | ||
| Place the jack under the axle of the cannon where the wheel is broken off. Insert the crank in the jack and hoist the cannon into an upright position. Pick up the cannon ball on the floor near the stairs and insert it in the muzzle of the cannon. Open the flap on the cannon and fill the chamber with the powder you made at the laboratory bench. Lastly, light the fuse on the cannon with the lighter to fire the cannon ball at the bricked up section of the wall. | ||
| Also, if you only fire the cannon now, the blast knocks Hector out and saves you the trouble of having to do it yourself. | ||
| With Hector rendered unconscious, retrieve the Manuscript by Leonardo Da Vinci. You must also leave either the Mona Lisa copy or original Mona Lisa against the wall for Hector to give to the king. Although you can leave either one, leaving the copy increases the level on the red (diabolical) conscience gauge, while leaving the original increases the white (angelic) level. It hardly matters at this late stage of the game. | ||
GOLD COINS | ||
| Are you still feeling aggrieved by Saturnin having extorted your gold coins? If so, you can go to his room and take them back. | ||
BID FAREWELL TO BABOU? | ||
| As promised, you must now go and say goodbye to Babou. If she's showing affection towards Valdo in the hero window she asks him to take her with. You can select to either do so or not. If she's not showing affection you have no choice other than to leave alone. | ||
| ||