
All images are property of
Warner Bros™
![]()
Written and illustrated by Dr. Hugh
Website conversion and layout by Bert Jamin

|
|
|
|
|
Click on one of these images to go to that Level
 |
 |
 |
 |
 |
 |
 |
 |
 |
 |
Or click on the image at the bottom of this page to go to the next Level
To go to one of the sublevels just click on one of these links:
© February
2003 Bert Jamin (www.gamesover.com)
This walkthrough may not be sold and may not be used for any commercial
purposes. Neither is it permitted to publish this walkthrough in any way without
the written permission of the author. Feel free to place this walkthrough on
your web site or on your home page, on condition that no part of this
walkthrough is changed and that the name of the author (Dr. Hugh), the URL of
the owner of this site (
www.gamesover.com ) and his E-mail address (
gamesover@planet.nl
) are mentioned unchanged. For the most up to date walkthroughs always visit
www.gamesover.com.
If you have any suggestions to improve this walkthrough, let me know by sending me an email: gamesover@planet.nl .
Level 4:
Tower and
Library
Use the Invisibility Cloak to avoid Filch and meet Ron’s
brother Charlie.
Find 1 secret Wizard Card. Find 1 Secret Area.
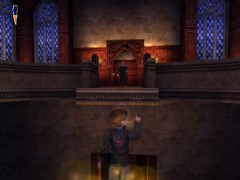
[4.1] With Norbert safely bundled up,
Harry set off for the tallest tower. He hoped that the cloak would conceal him
from Filch and his cat, Mrs. Norris.
Harry runs through a door behind Argus Filch who is
carrying a petrol torch. He turns around:
Eh? Whassat!
Follow Filch but make sure you stay out of reach of his torch
light or he will catch Harry!
Turn left behind the corner. Filch will take the left side of
the central bookcase. You’d better take the right side, run to the end and walk
up a small staircase of three steps around the corner left. From there, cast
Alohomora on the opposite door and open it.

Harry is safe on
high
First climb the bookcase and jump from case to case grabbing
a couple of Beans.
Then, return to this spot and make sure Filch is walking in the opposite direction. Jump down and leave through the door you’ve just opened. On your left there is a Save Book.

A save Book on
your left
Wait a few seconds and turn right, run up the staircase. In a
cut scene you’ll watch Filch leaving this area through a secret door. The door
you just ran through closes now.
[4.2] Run up the stairs and open the
door with Alohomora.
Enter and past the corner left you’ll see Filch patrolling
again in the upper part of the Library. You’ll also notice a Flipendo switch.
Wait for Filch to turn right and run to the alcove between two bookcases where
the switch is.
Don’t cast Flipendo yet but turn around and watch Filch going
up and down.
In a cinematic you will see how a door unlocks. Immediately
Filch will run to the door and say:
Meantime you’ve also noticed that the door is at the other
end of the Library.
First jump to the other bookcases and grab more Beans. Stand
on the last bookcase and from here watch Filch going backward. Jump safely down
and leave by the door.
Go left and you’ll find your next Save Book. Run to it and
you’ll watch Filch disappearing once again by a secret door. Save.
[4.3] Turn right and cast Alohomora
on the door to open it.
Harry enters another room of the Library. Filch is patrolling
on the blue carpet. There is a Flipendo switch in the corner on the right, but
leave that for the time being. Always aware of Filch turn left and follow the
blue carpet till you’ll find an alcove on your left with a door and a lock. Open
it with Alohomora.
Quickly run inside the room and you’ll hear Filch laughing
behind you. But he won’t follow in. When he has left, cast Flipendo on the wall
switch. That will open a grilled door higher up.
Now how can I get up there? ,
says Harry.
Go out this room and return to the Flipendo switch you just saw in the corner. Now cast Flipendo (from a distance) and the bookcase will fall down forming a ramp to the top of the cases.

A ramp to the top
of the bookcases
Quickly jump on that ramp before Filch catches you (he’ll
come running to this spot) and walk up.
Harry can reach the entrance you just saw. Go inside and cast Flipendo at the switch on your left, which will open a door downstairs.

Flipendo on this
switch
Immediately Filch will run to that spot, so you can see where it is located. There is a door with a lock in the unveiled small room.

That’s Harry’s
next destination!
Go out here and jump back to the opposite bookshelf. Standing
at the corner of the bookshelf turn left and from there cast Alohomora on the
door in the alcove.

Alohomora on top
of the bookcase
When Filch has gone jump down and cast Flipendo on the switch
inside the new room. That will open another grille upstairs.
Return to the ramp and ascend. Find your way to the new area
and enter.
Cast Flipendo on the switch and an exit door will open
downstairs to a second room.
Go up to the Gargoyle and cast Lumos. That will charm a
staircase of three Magic Clouds in the second room.

Three Magic Clouds
are charmed
Jump and climb from Cloud to Cloud and up to the balcony.
Take a Bean.
Look down and observe a Flipendo switch in the fourth room.
Jump down; there is also a Gargoyle in a niche. Cast Flipendo on the switch
which will open one door and close another, whilst Filch will disappear again
through a secret door.
Cast Lumos on the Gargoyle. Now it’s becoming really weird.
You’ll see a number of Magic Clouds and another area with a Gargoyle.
Jump from Cloud to cloud and up to the balcony. Go to the
other side, where there are three more Magic clouds in the air. Jump from Cloud
to Cloud to a higher balcony and grab a Bean.
Cross the balcony and you’ll see a Magic cloud. Jump from
there to a higher balcony. There is an alcove with a Gargoyle, the one you just
saw in a cut scene.
Cast Lumos on him and that will charm one more Magic cloud in
the previous area.
Take a Bean and turn left. Here are two Magic clouds.

From the first
Cloud you’ll notice the chest down below
Jump all the way down. In this
corridor you’ll find a Flipendo switch on one side and a chest on the other.
Cast Alohomora on the chest and acquire your
Wizard Card #72: Helga Hufflepuff,
Medieval Wizard, dates unknown. Co-founder of Hogwarts. Gave her name to one of
the four Hogwarts houses.

The chest contains
a Wizard Card
Turn around and cast Flipendo on the switch. That will open
the door on your right side. Harry is back in the lower room with the Gargoyle.
Go left and ascend the staircase of three Magic clouds once again.
Jump to the balcony and cross it. On the other side there are
your three other Magic Clouds. Jump from there to the balcony. Now turn around
and jump to the next higher Magic Cloud. From here jump to the balcony on your
right. Turn left and now Harry is back in front of the two Clouds where he
jumped down to the chest a while ago.
Jump from Cloud to Cloud to the next balcony.

Here is your next
Save Book.
[4.4] Turn left and go to the
balcony.
You’ll find a staircase of Magic Clouds.

Another Magic
Staircase
Jump from Cloud to Cloud and from the 6th and
highest Cloud you’ll see Flich patrolling with his oil lamp once again.
Filch keeps
following Harry
Jump to the ledge when the coast is clear and promptly
proceed to the room in front of Harry. Cast Flipendo at the sign on your right.
That will let the bridge rotate through a quarter circle.
Filch runs to the opposite side:
D’you think I’m blind? I’m not
letting anyone into that tower tonight!
Go out and walk to the top of the bridge. A cut scene will
give you a view of two jars on the right side. One of the jars breaks into
pieces and... Peeves emerges!

Damned Peeves
again!
Promptly Filch runs to Peeves:
Peeves, you’ll be
banished for this!
From the top of the bridge our clever friend Harry Potter
observes this event:
Still standing on this position, cast Flipendo at a jar on
Harry’s left side.

The high tower
Ron’s brother, Charlie, had arranged to collect the Dragon
from the tower and return him to Romania.

Hagrid’s Dragon is
returning to Romania
Up to the next sublevel...
